
Dispatcher Panel Get Support 24/7
Settings
The Dispatcher Panel’s Settings tab is where the entire delivery ecosystem gets tailored. It’s the command center—from login methods to wallet behavior, everything starts here.
General Settings
This is where all the configuration magic happens
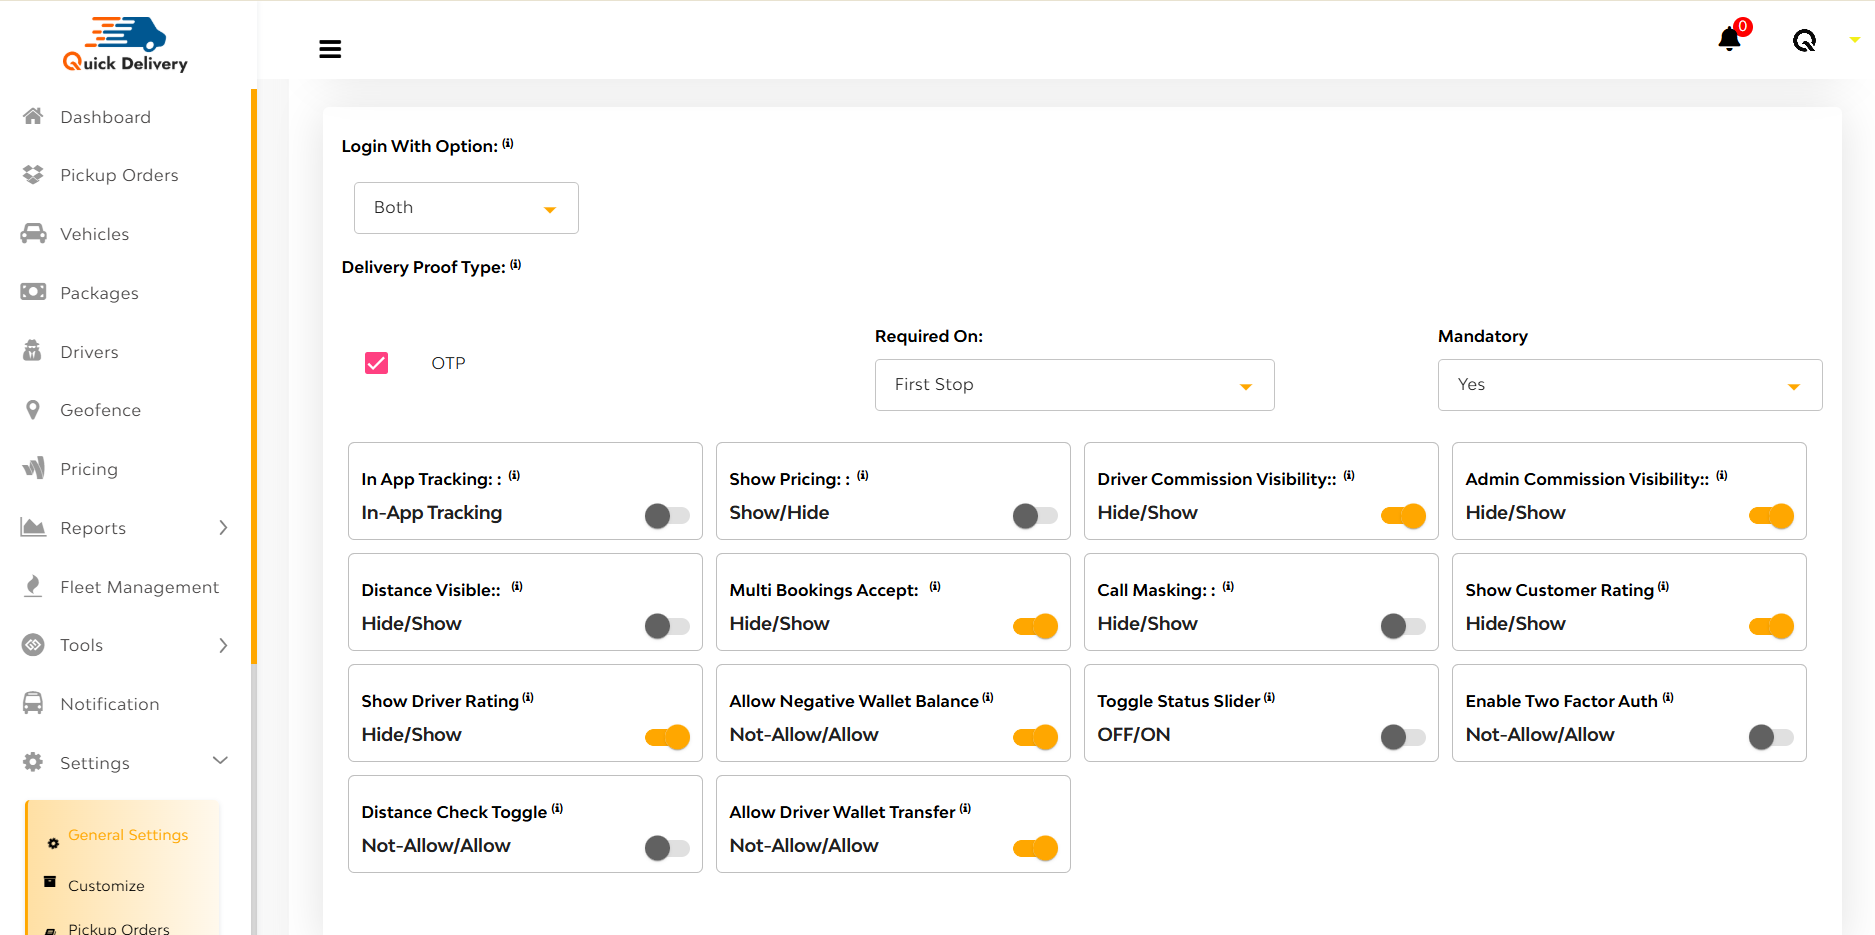
Login Options
Right at the top, you’ll find the Login With Option dropdown:
Choose how users log in:
- Phone Number
- Both
This lets you customize access methods based on your audience’s preferences.
Delivery Proof Type
Add an extra security layer with OTP-based delivery proof. It’s optional, toggle it ON for sensitive deliveries or OFF for a smoother experience.
Feature Toggles
Next comes a powerful switchboard of toggles—turn features on or off with a click:
- In-App Tracking
- Show Pricing
- Show Driver/Admin Commissions
- Distance Visibility
- Multi Bookings
- Call Masking
- Show Customer & Driver Ratings
- Allow Negative Wallet Balance
- Toggle Status Slider
- Two-Factor Authentication
- Distance Check
- Allow Driver Wallet Transfers
This section is like flipping switches in a cockpit—customize your platform experience instantly.
System Configuration Dropdowns
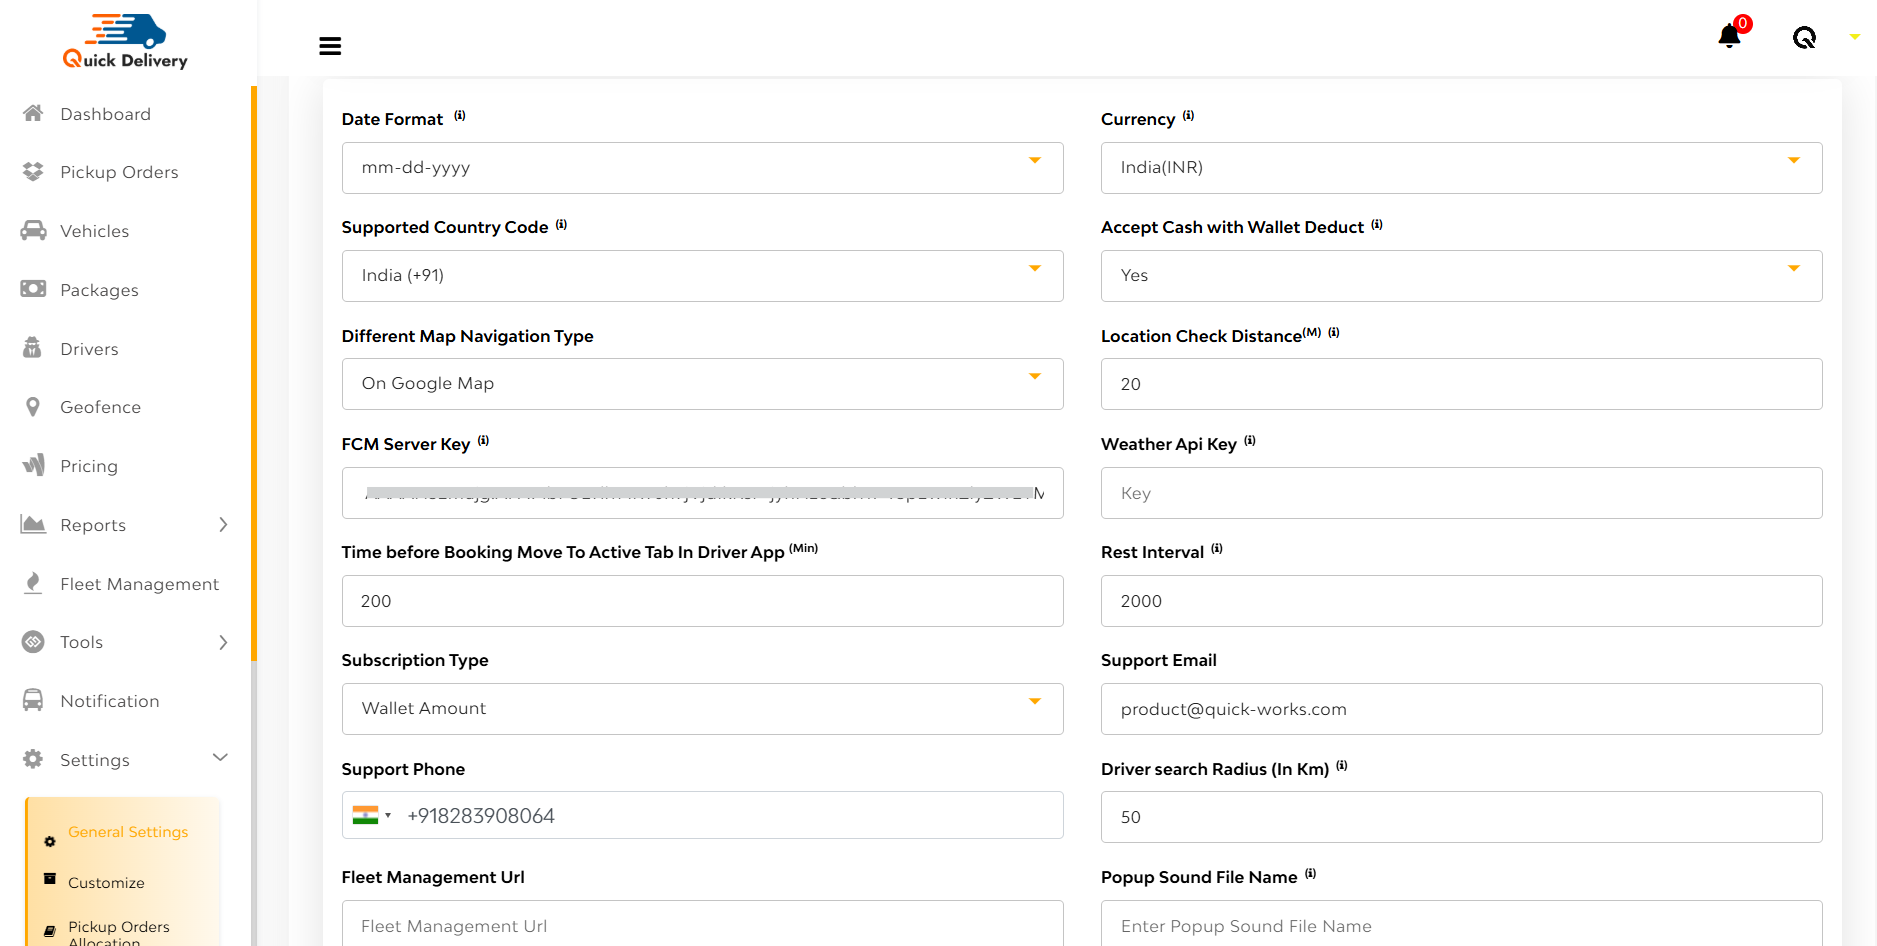
Below the toggles are dropdowns that define how your system behaves globally:
- Date Format: dd-mm-yyyy or mm-dd-yyyy
- Currency: Select from global options
- Supported Country Code
- Accept Cash with Wallet Deduct (Yes/No)
- Map Type: Google Maps or Waze
- Location Check Distance (in meters)
- API Keys: For FCM, Weather
- Booking Timing Rules & Distance Logic
- Driver Search Radius (in km)
- Subscription Type: Based on Wallet Amount or App Usage
- Admin Contact Details: Email, Phone Number
- Fleet Management URL
- Popup Sound File Name
- Time Format: 12-hour or 24-hour
After that you can see
Google API Keys: For Panel, Android, Backend, and iOS
This section ensures that your platform runs in sync with your operational geography, time zones, and data sources.
Wallet, Tip & Distance Settings

Wallet Settings
Control how in-app wallets work:
- Enable/Disable wallet feature
- Set wallet credit/debit limits
- Choose whether to send wallet notifications to users
Tip Configuration
Set:
- Admin’s share of tips as a percentage
- Preferred payment mode for tipping (wallet, card, etc.)
Distance Rules
Define:
- Unit of Distance: Kilometers or Miles
- Minimum Ride Distance allowed on the platform
Customize
The Customize tab is where your dispatcher platform gets its personality. From logos to color schemes and key branding links, everything you set here ensures consistency across all touchpoints — be it the user app, driver app, or admin panel.
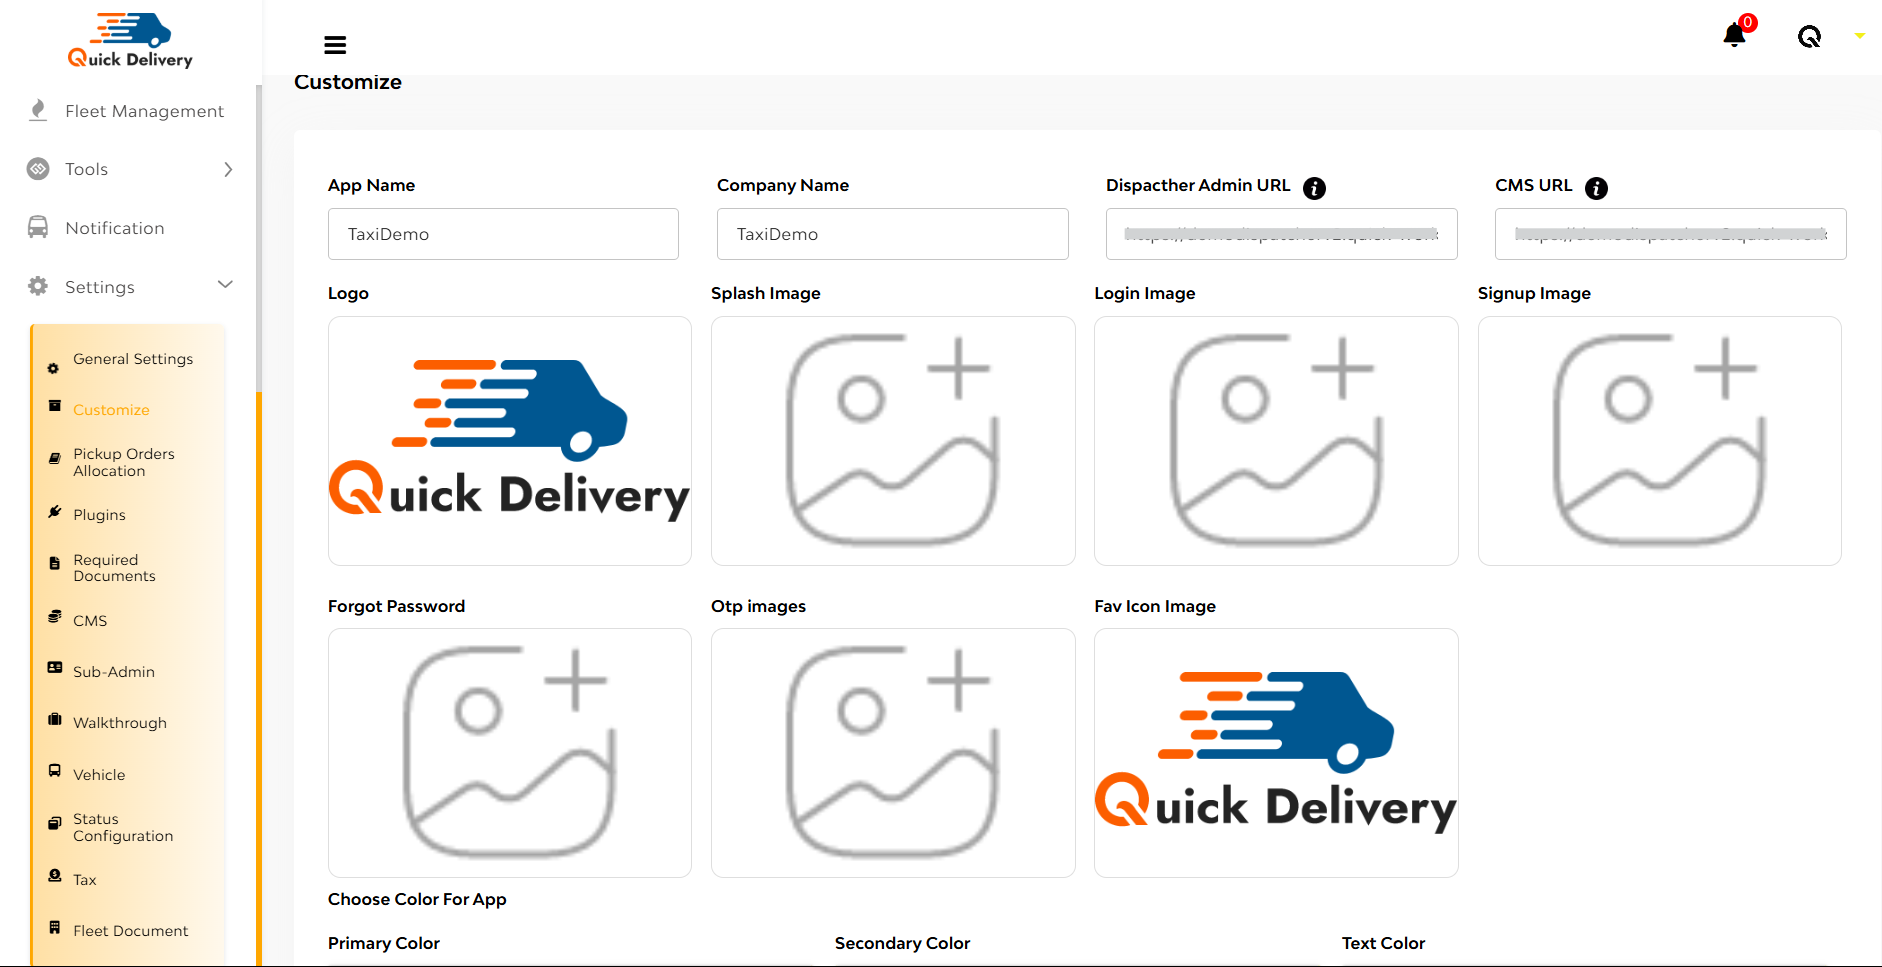
Once you click Customize, you’re greeted with a clean interface where you can tailor the look and basic identity settings of your dispatcher system. Here’s what each field means:
- App Name & Company Name
- Set your app and business identity here.
- Whatever you write reflects across the system, making it unique to your brand.
- Dispatcher Admin URL & CMS URL
- These fields let you define where your admin and content management interfaces are hosted.
- Perfect for linking to external management tools or custom CMS platforms.
- Logo & Images
- Upload your Logo, Splash Image, Login Image, Signup Image, Forgot Password, OTP, and Favicon to personalize your user experience from start to finish.
- These visuals appear across your app interfaces, reinforcing your brand presence.
- App Colors
- Choose the Primary, Secondary, and Text Colors to match your brand’s theme.
- This controls the look and feel of your app’s UI, keeping things on-brand.
- Hit Save button!
Pickup Orders Allocation
The Pickup Orders Allocation screen lets you choose how orders are dispatched to your drivers.
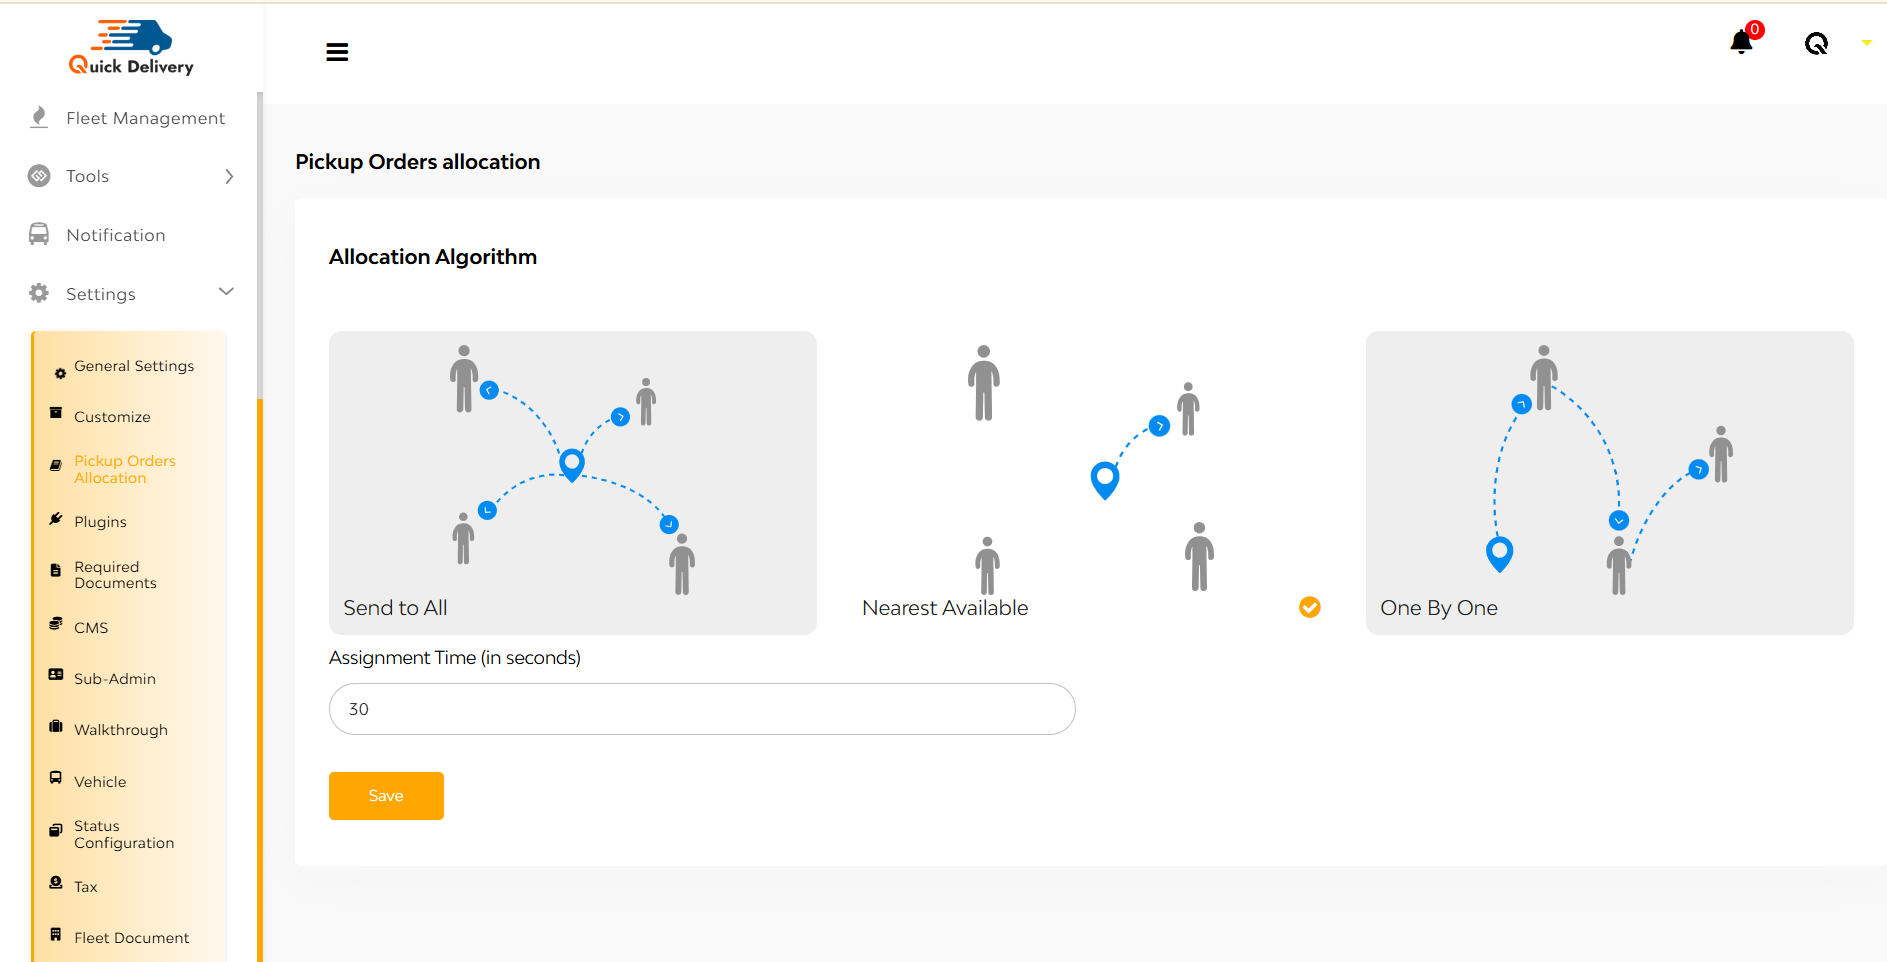
Allocation Algorithm Options:
- Send to All: Sends the pickup request to all nearby drivers at once. The first to accept gets the job.
- Nearest Available: Sends the request only to the driver closest to the pickup point. Fast and efficient.
- One By One: Sends the request to drivers one at a time, based on proximity or priority. If one rejects or doesn’t respond, it moves to the next.
Assignment Time (in seconds):
Right below the options, there’s a field to input how long a driver has to accept a request (e.g., 30 seconds). Once that time is up, it moves on to the next driver or drops the request, depending on the method selected.
Hit Save Button!
Plugins
The Plugins section is your command center for integrating essential external services into your delivery system. It’s cleanly organized into 5 tabs:
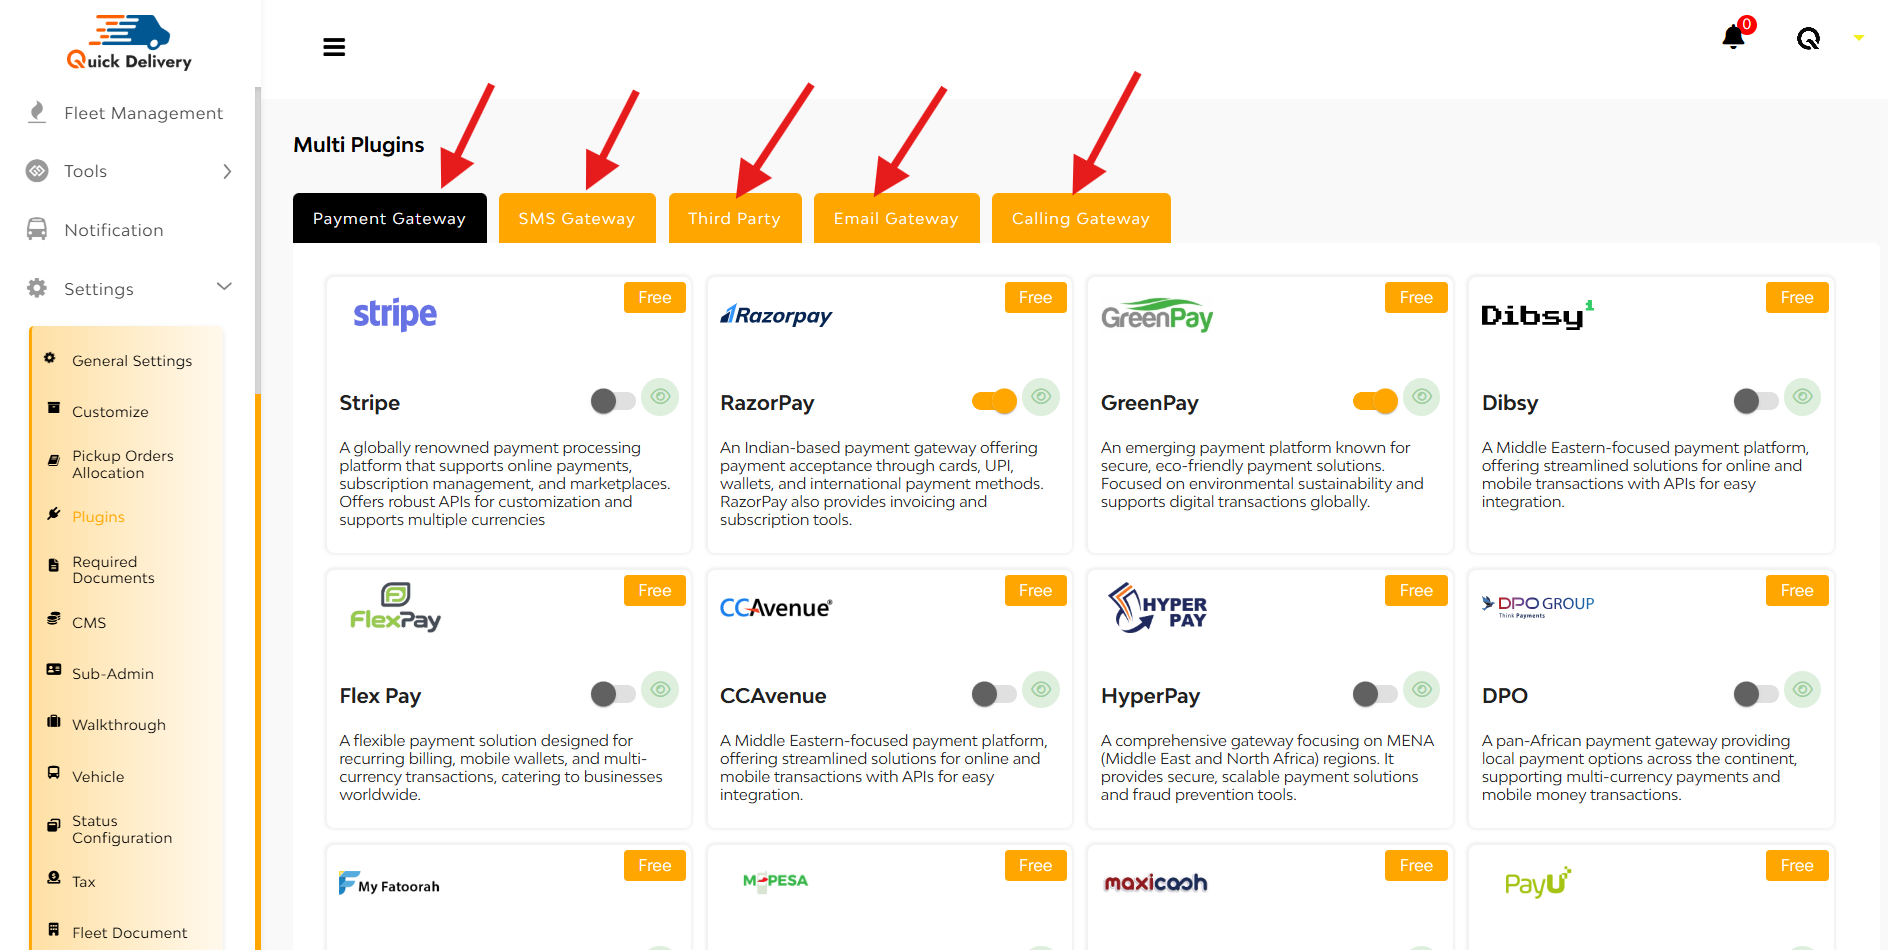
- Payment Gateway
- SMS Gateway
- Third Party
- Email Gateway
- Calling Gateway
Each tab lets you toggle between multiple service providers and enable/disable them with just a switch.
Under Payment Gateway, you’ll see popular services like Stripe, RazorPay, GreenPay, Dibsy, and many others. Each plugin block includes:
- A short description about the gateway
- A toggle switch to enable or disable
- A “Free” tag to indicate no added cost
- An eye icon to preview
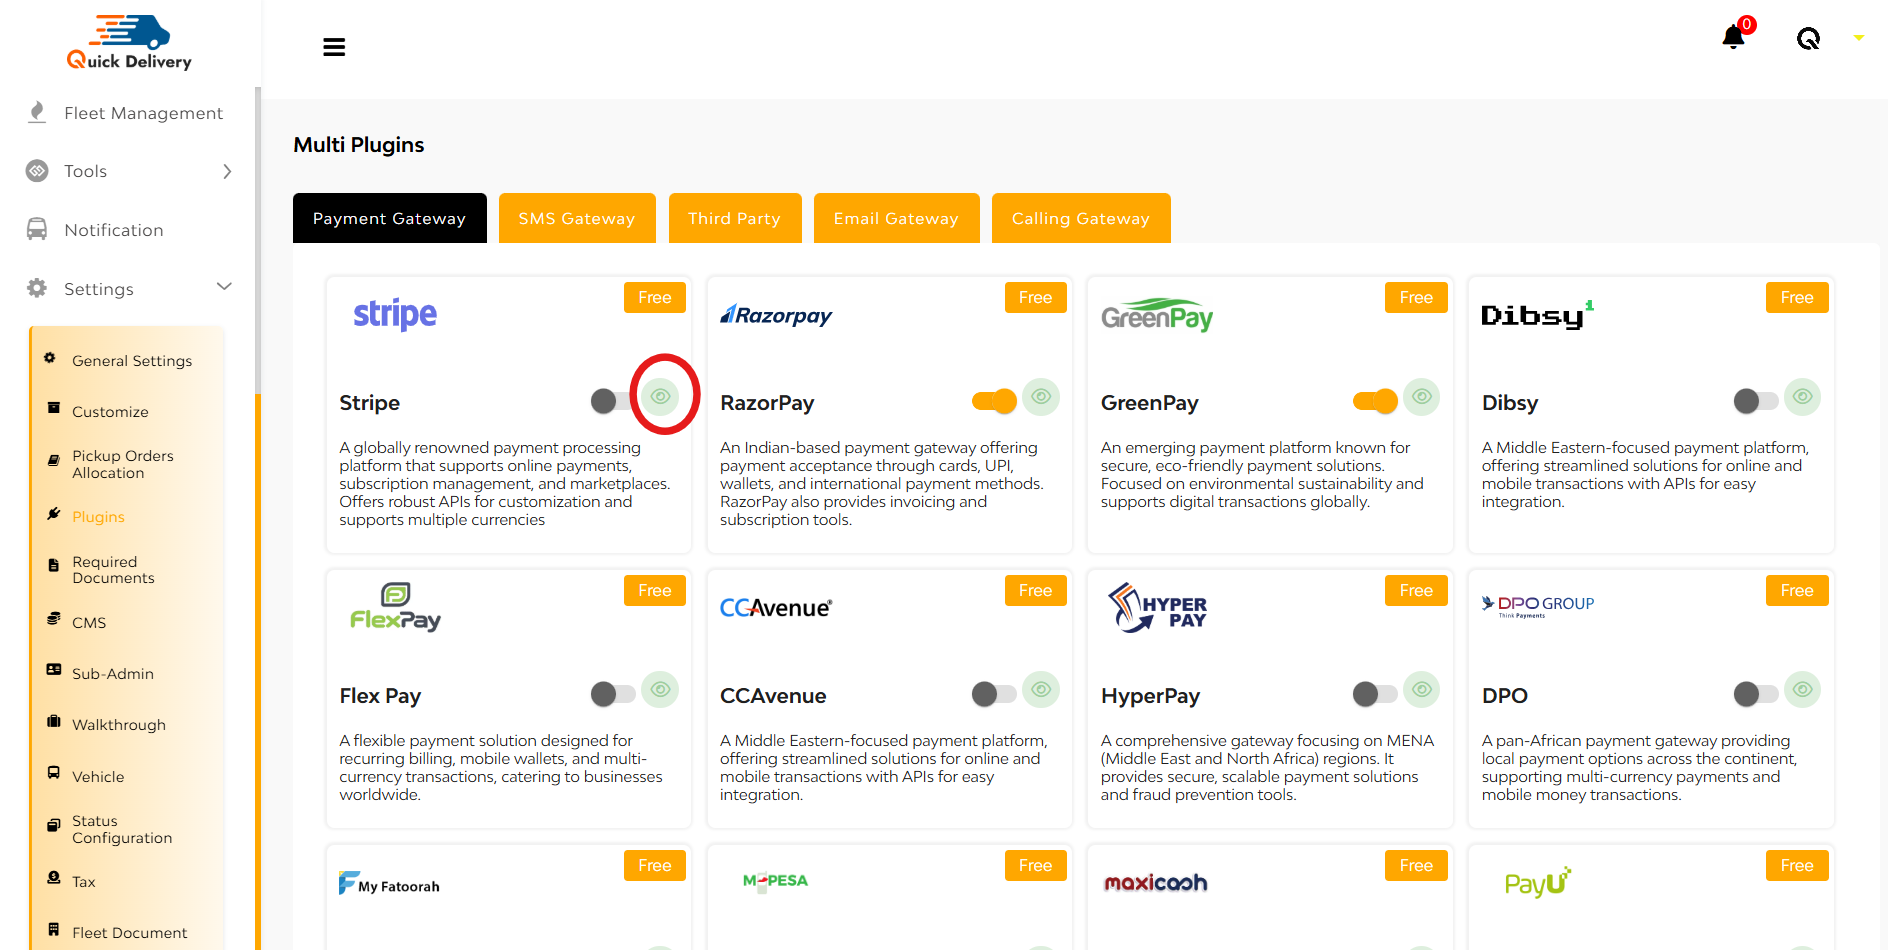
while tapping on the eye button, you can see a pop-up will open. There you can see
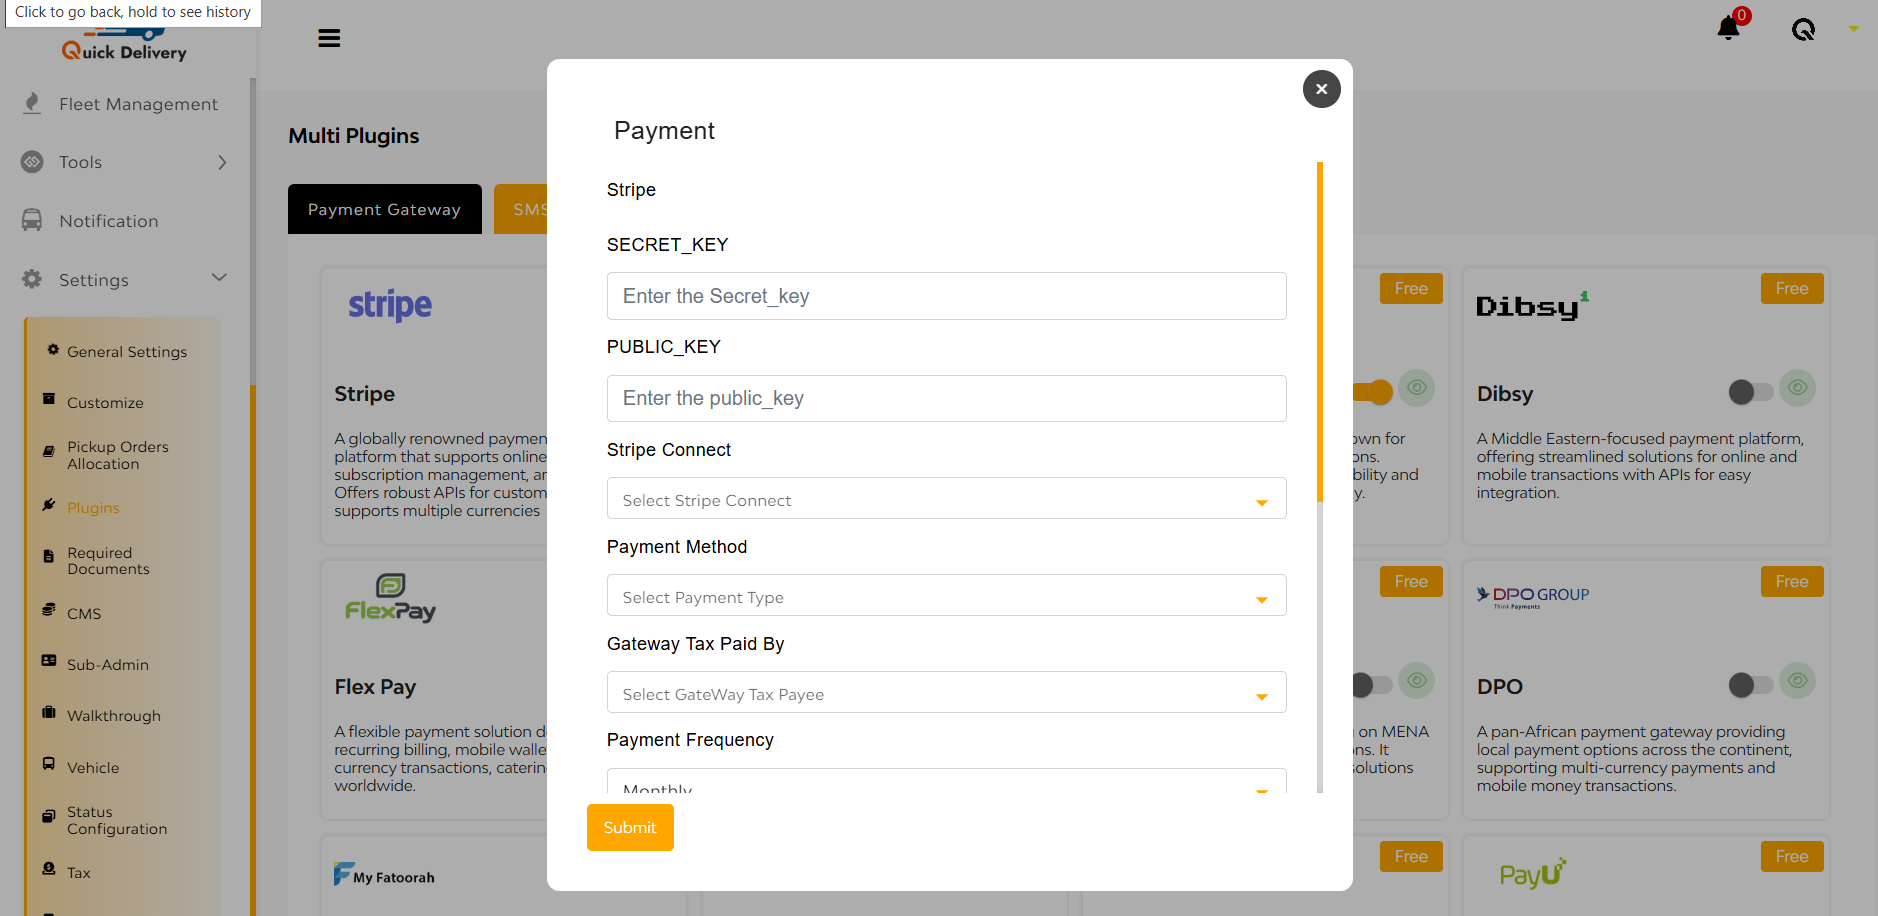
Here you can enter
- Secret Key
- Public Key
- Stripe Connect(yes/no)
- Payment Method(automatic/manual)
- Gateway Tax Paid By(admin/merchant)
- Payment Frequency(monthly/weekly)
- dayOfPay
- Select the toggle for Google Pay, Apple Pay, both
- Payment Charges (%)
- Additional Charges (Flat)
- CountryCode
- Merchant Name
- Environment
At the bottom two buttons are there ‘submit’, ‘cancel’
Under SMS Gateway, you’ll see popular services like Twilio, Sinch etc. With a toggle-based activation system and form-based credential input, enabling these services is as easy as flipping a switch and pasting in keys or tokens.
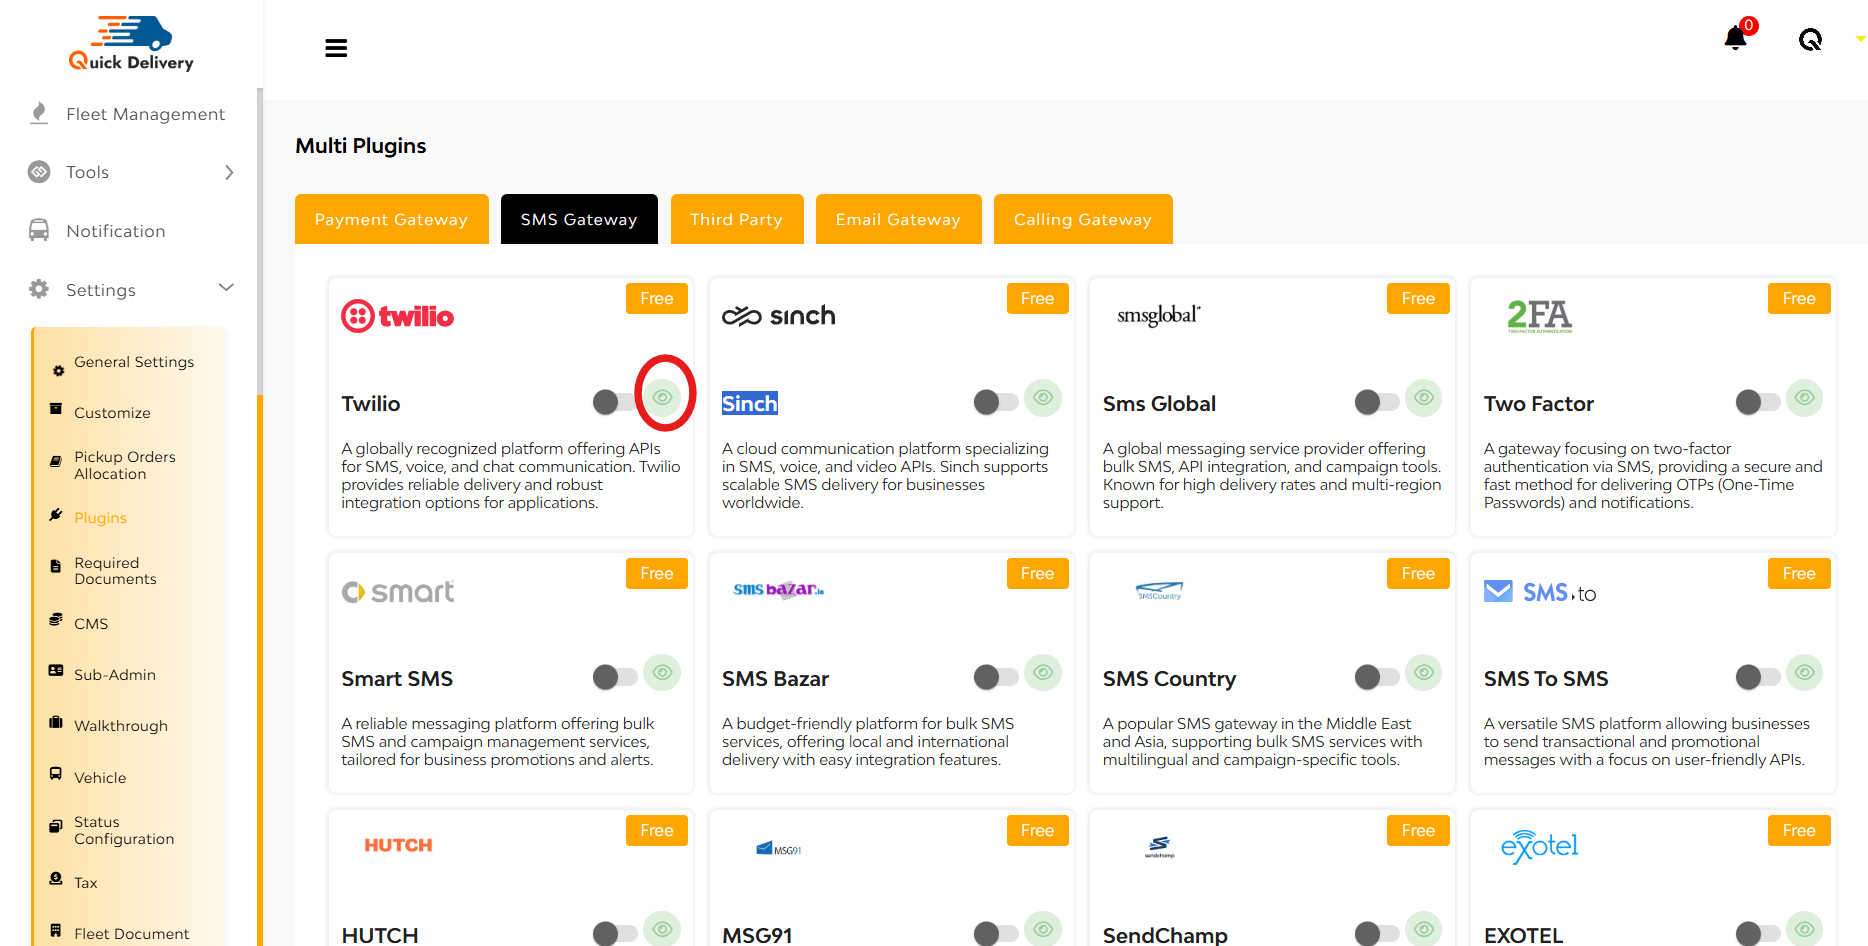
While tapping over the eye button you can see a pop up will open. There you can see
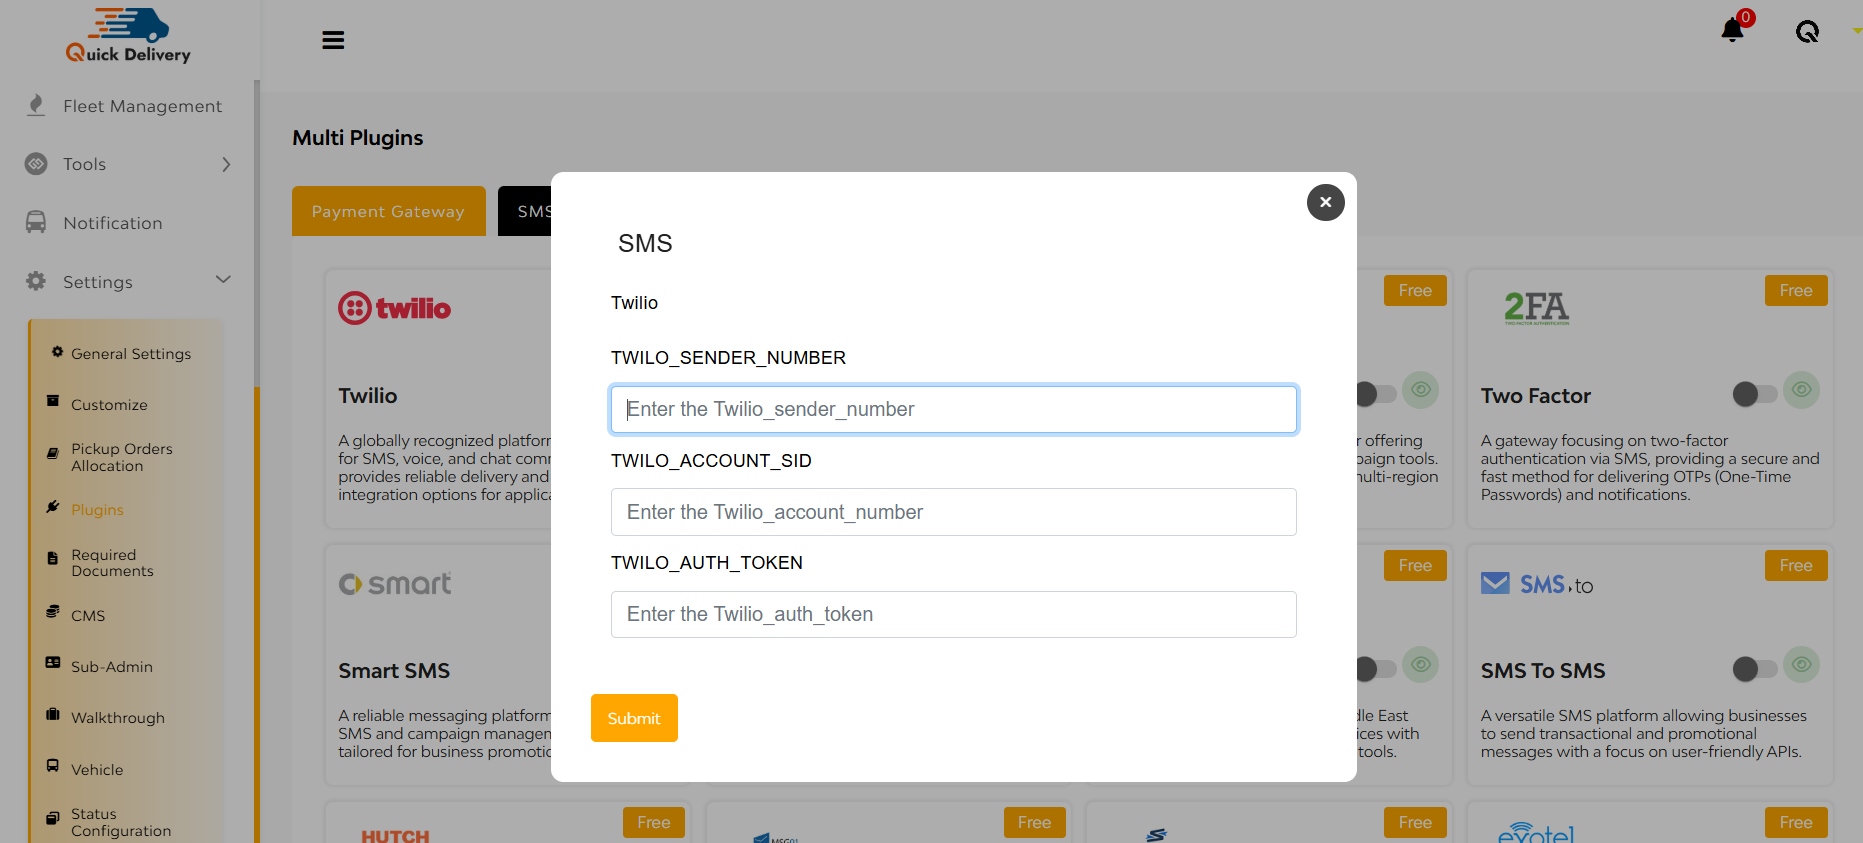
By entering your sender number, Account SID, and Auth Token. Once configured, you can send real-time alerts to users.
Under Third Party, you’ll see popular services like Firebase Private Key, Zendesk.
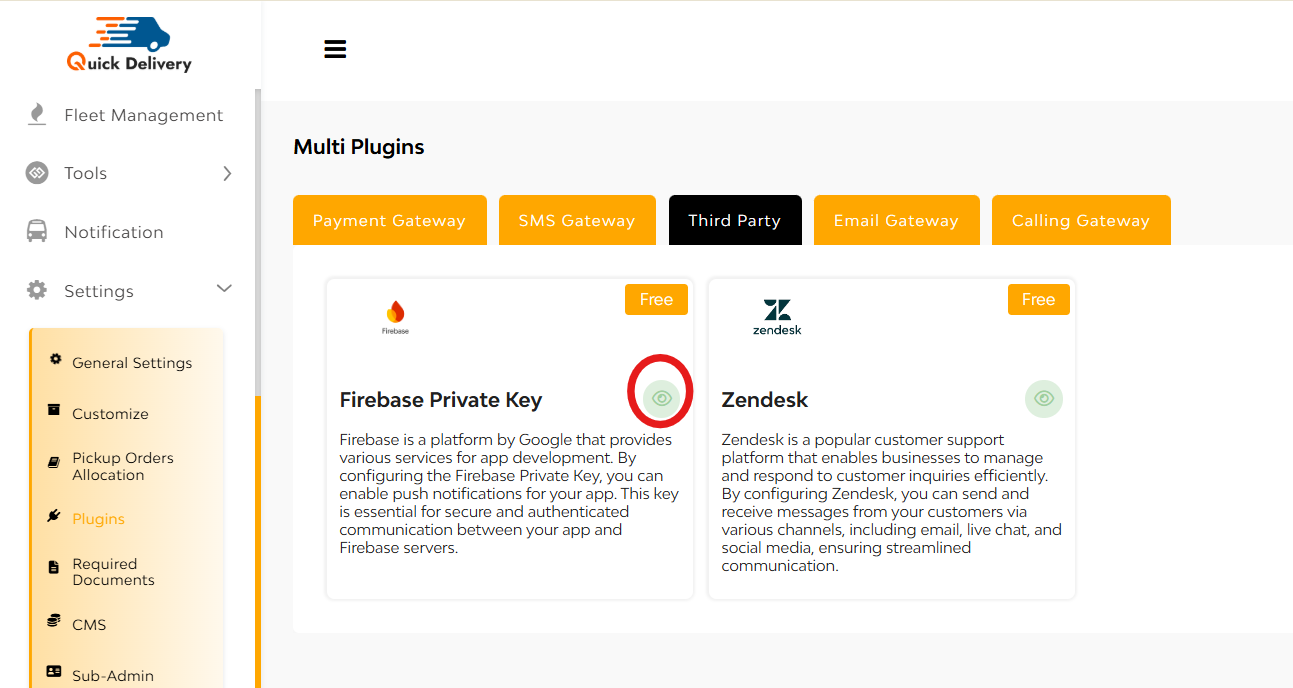
While tapping on the eye button, you can see a pop-up will open. There you can see
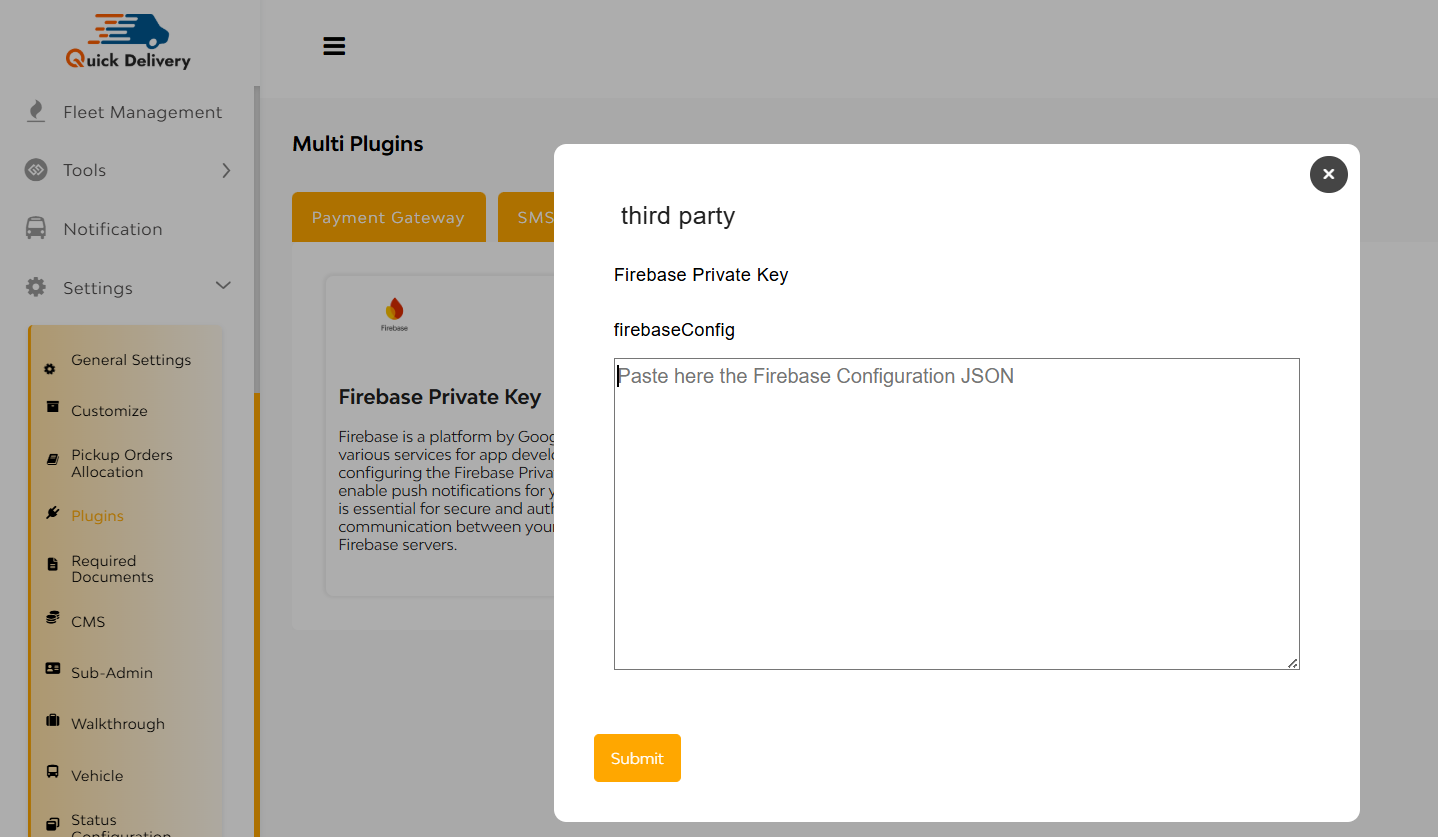
Just paste your Firebase JSON key and submit!
Under Email Gateway, you’ll see popular services like SendGrid, MailChimp, Node Mailer etc.
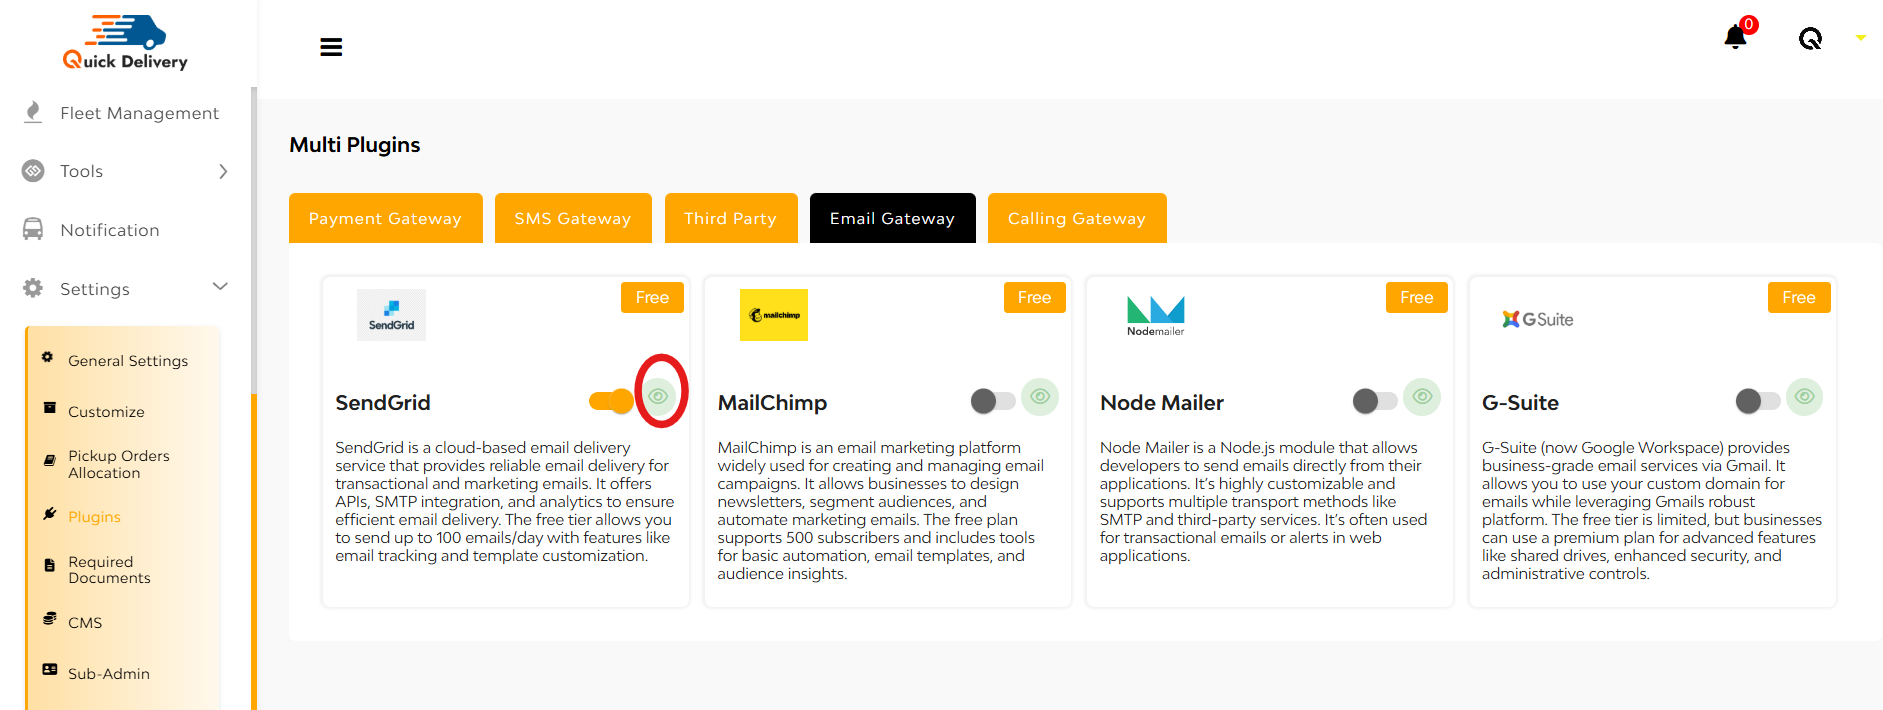
while tapping on the eye icon to open the configuration modal. There you can see

Enter details like SendGridFromEmail and SendGridKey, and hit Submit to activate.
Under Calling Gateway, you can automate voice calls and manage IVRs with Exotel or Twillio.
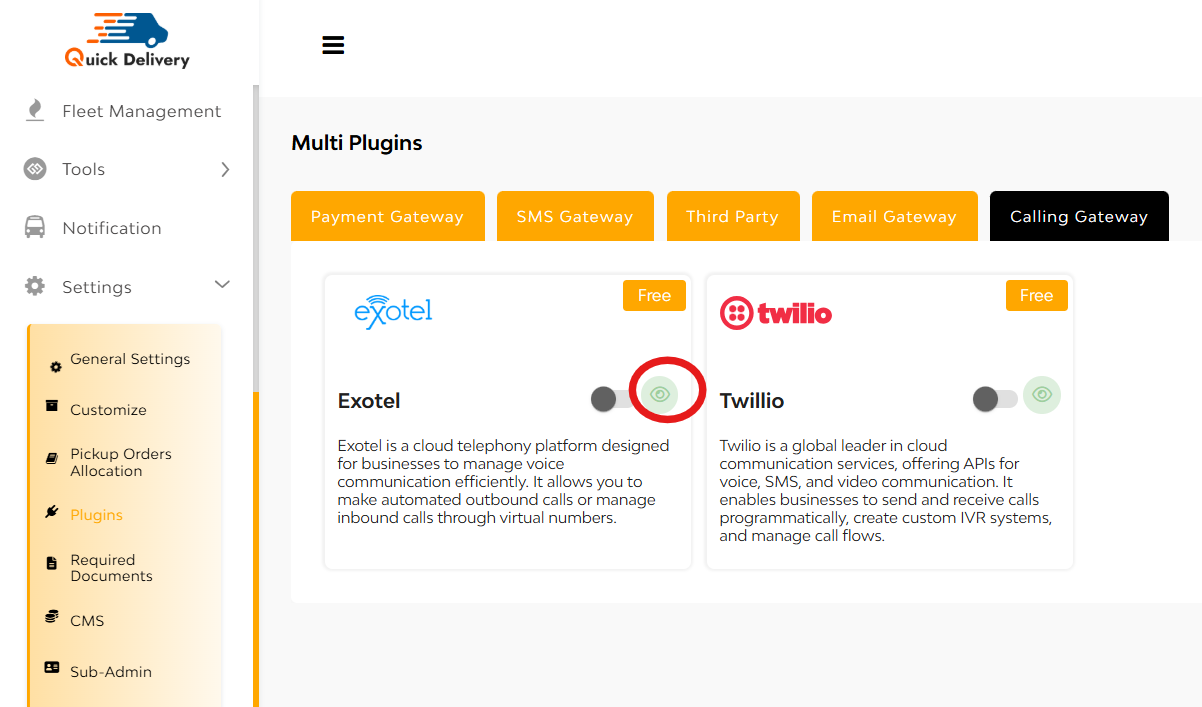
while tapping on the eye icon to open the configuration modal. There you can see
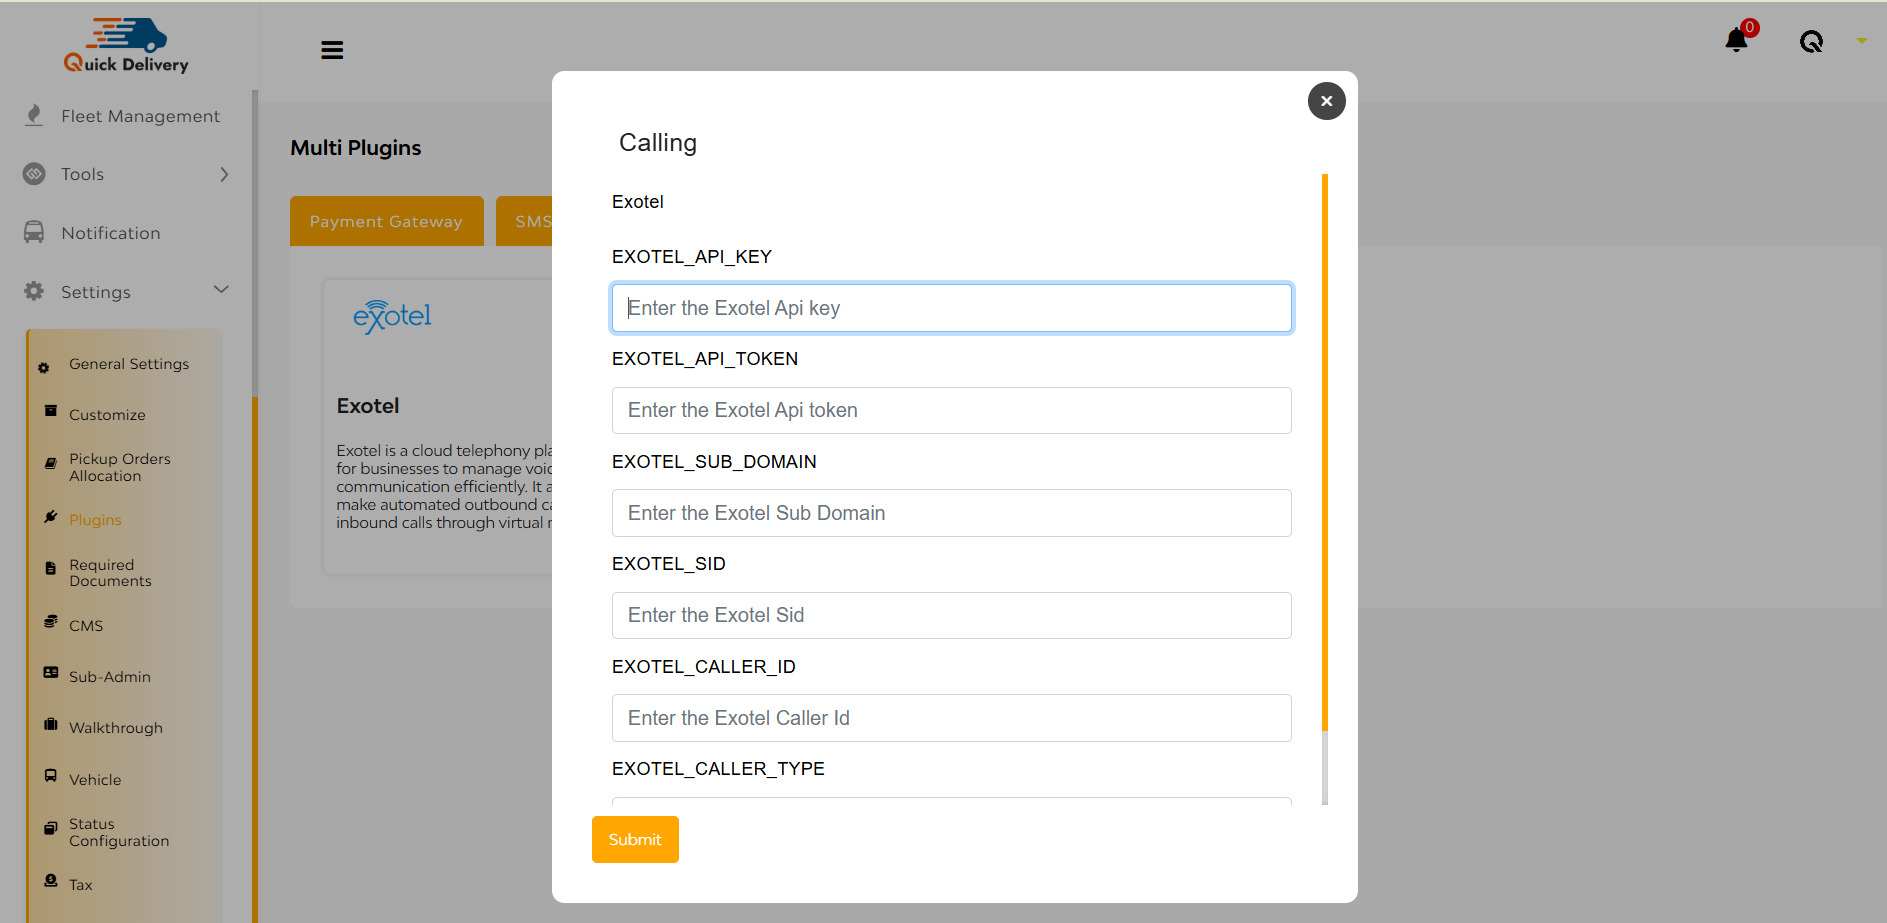
Configuration fields include API Keys, API Token, Sub Domain, SID, Caller ID, and Caller Type. Once filled, hit Submit to go live.
Required Documents
The Required Documents section is where the dispatcher ensures that all necessary documentation for drivers is properly tracked and managed.
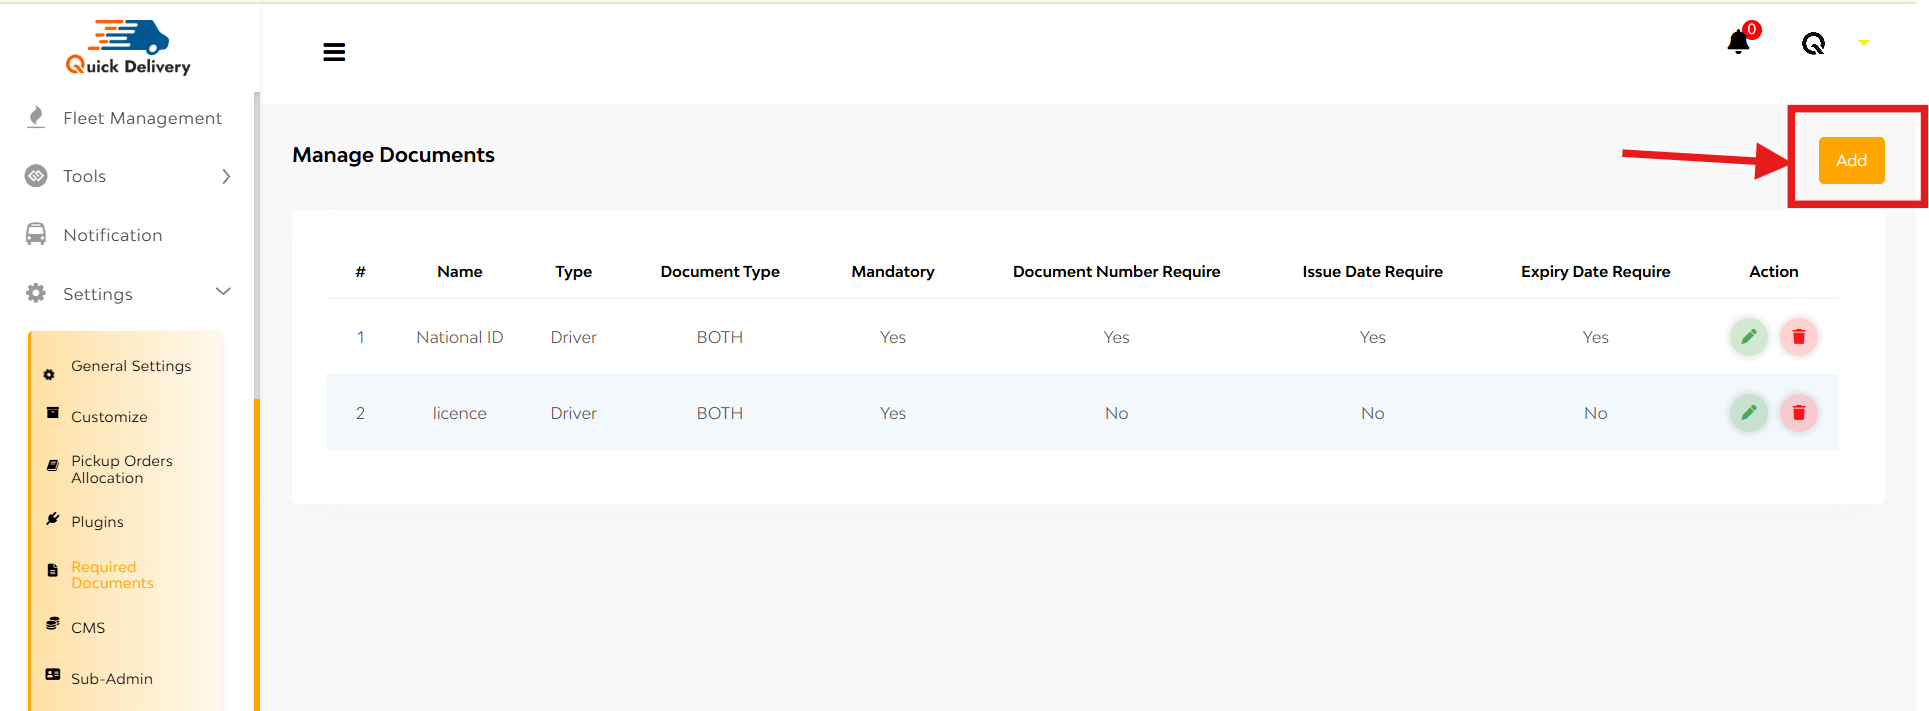
Each document entry includes:
- Document Name (e.g., National ID, License)
- Type (who it applies to – in this case, Driver)
- Document Type (either Driver, Vehicle, or Both)
- Mandatory (Yes/No)
- Document Number Required
- Issue Date Required
- Expiry Date Required
+Add
Use the Add button at the top-right corner to input a new document.
A form slides in, allowing the dispatcher to customize requirements for the new document.
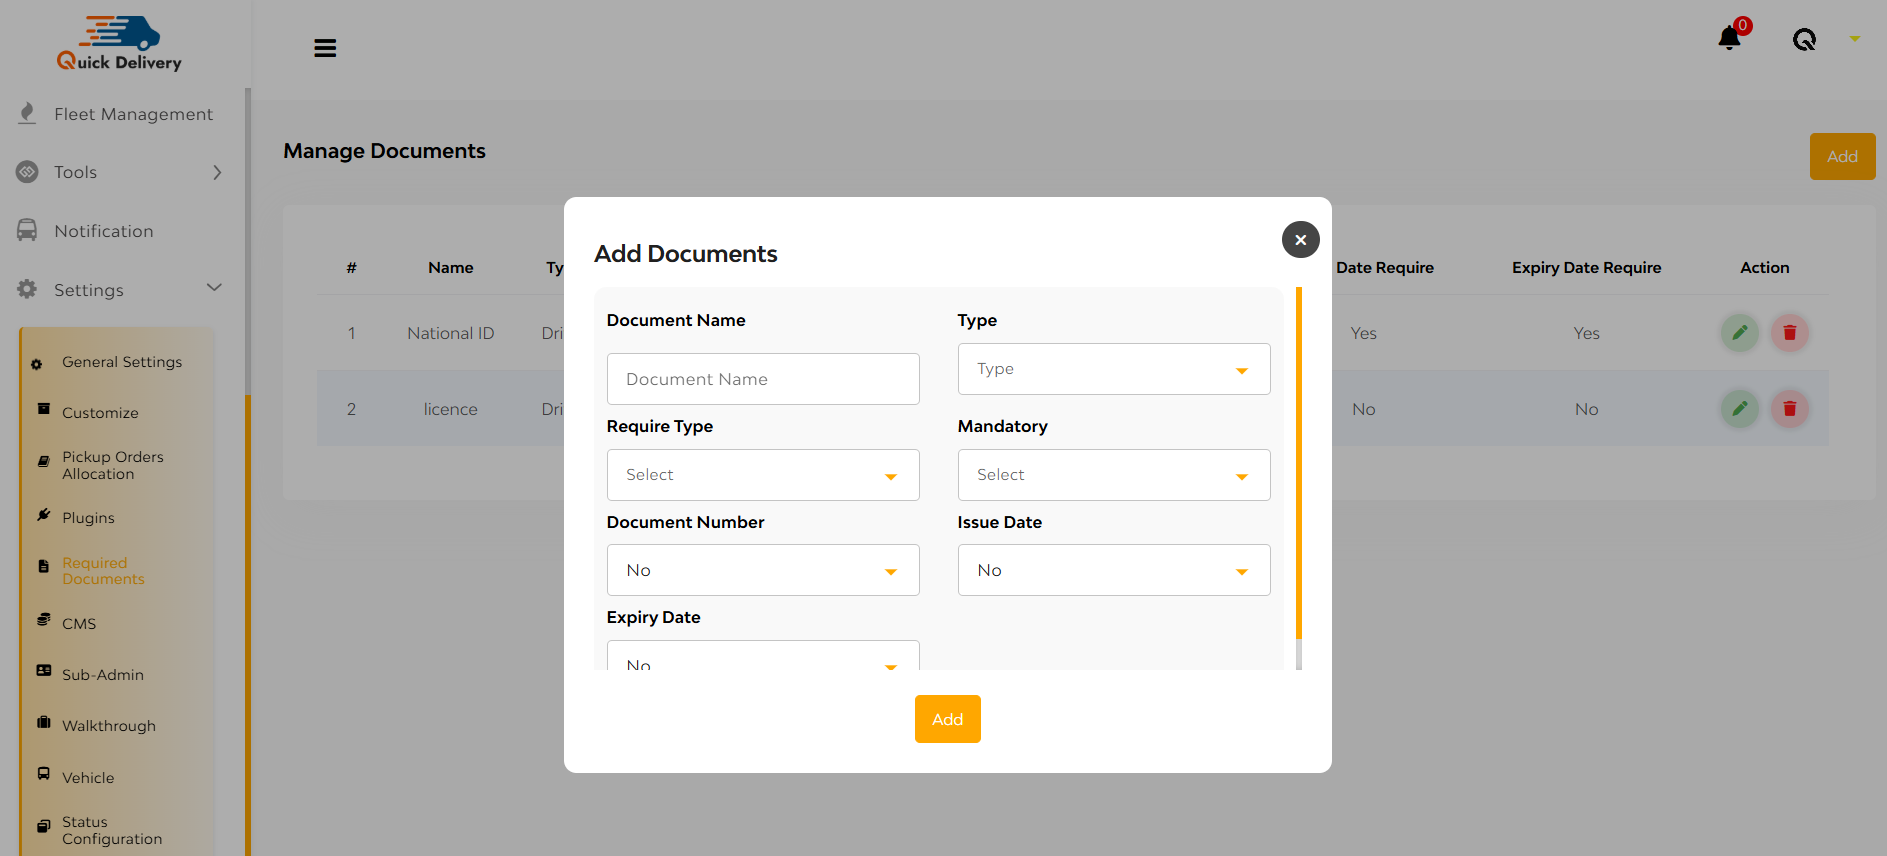
Here you can enter:
- Document Name
- Type (Driver/Vehicle)
- Require Type (front/back/both)
- Mandatory(yes/no)
- Document number
- Issue Dates
- Expiry Date
- Hit Add Button
CMS
The CMS (Content Management System) feature lets admins easily create and manage all essential static pages like Privacy Policy for Partners, Terms & Conditions, FAQs, without writing a single line of code.
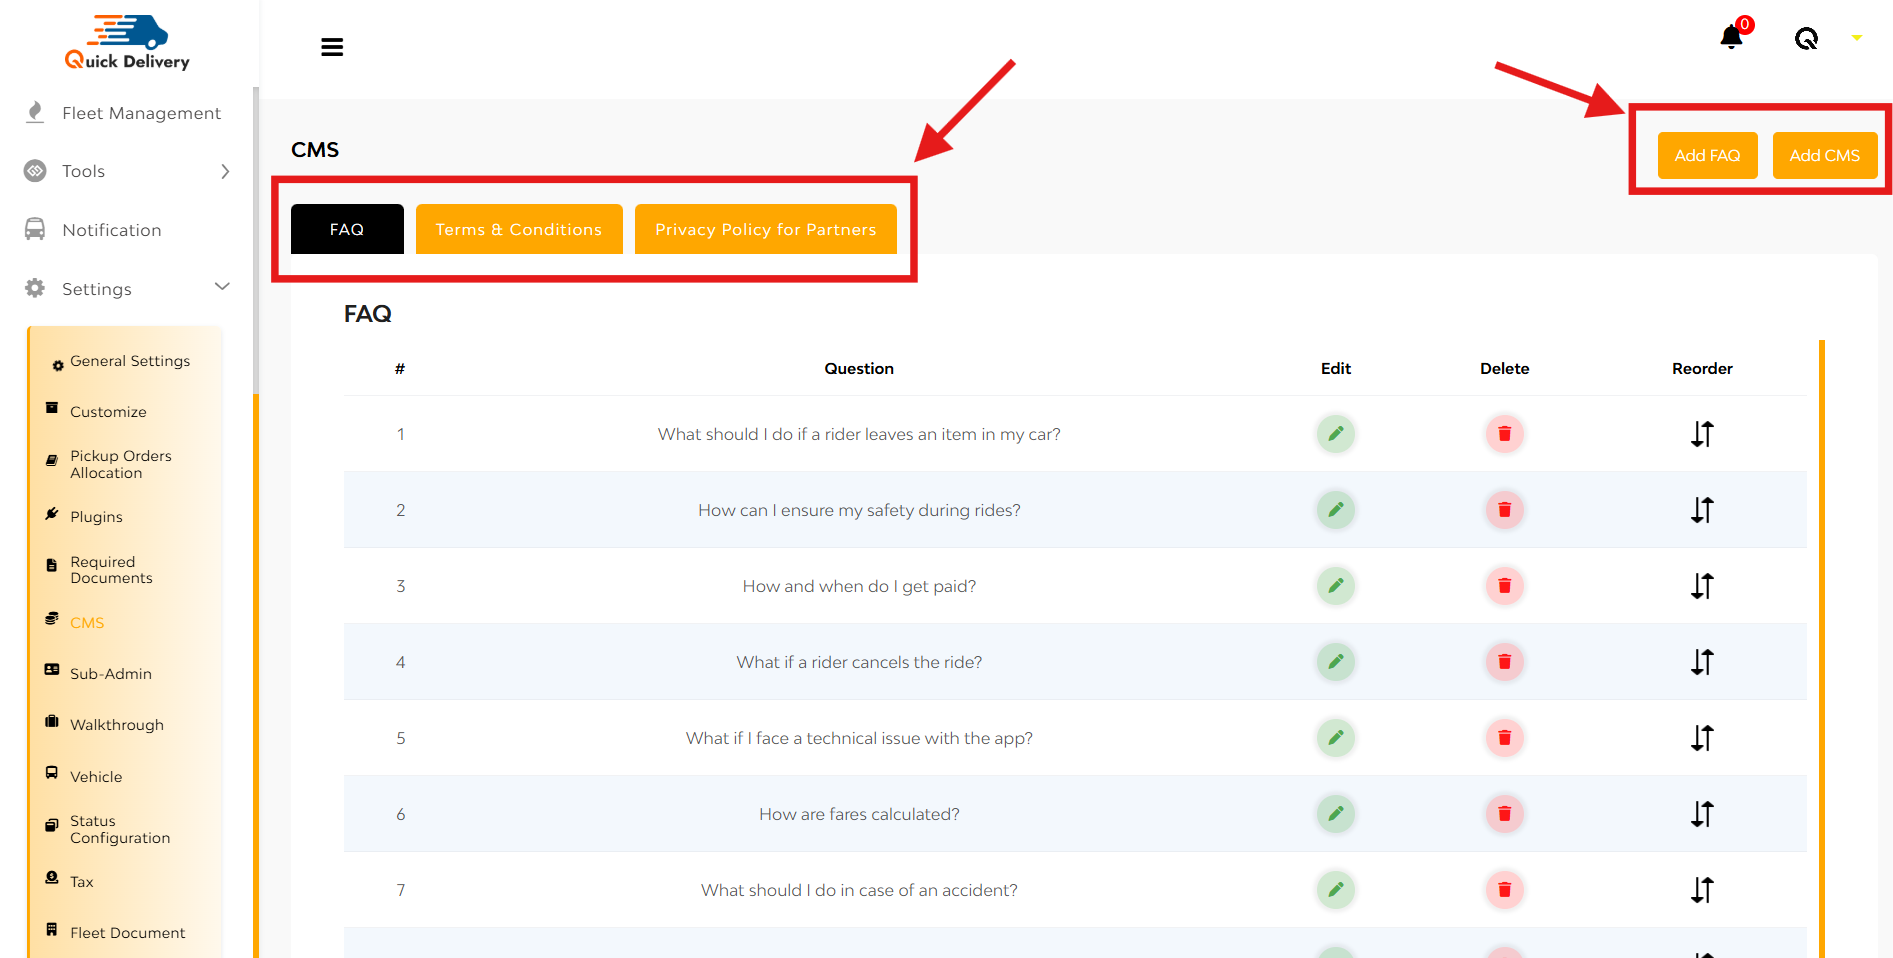
Adding or Editing FAQs
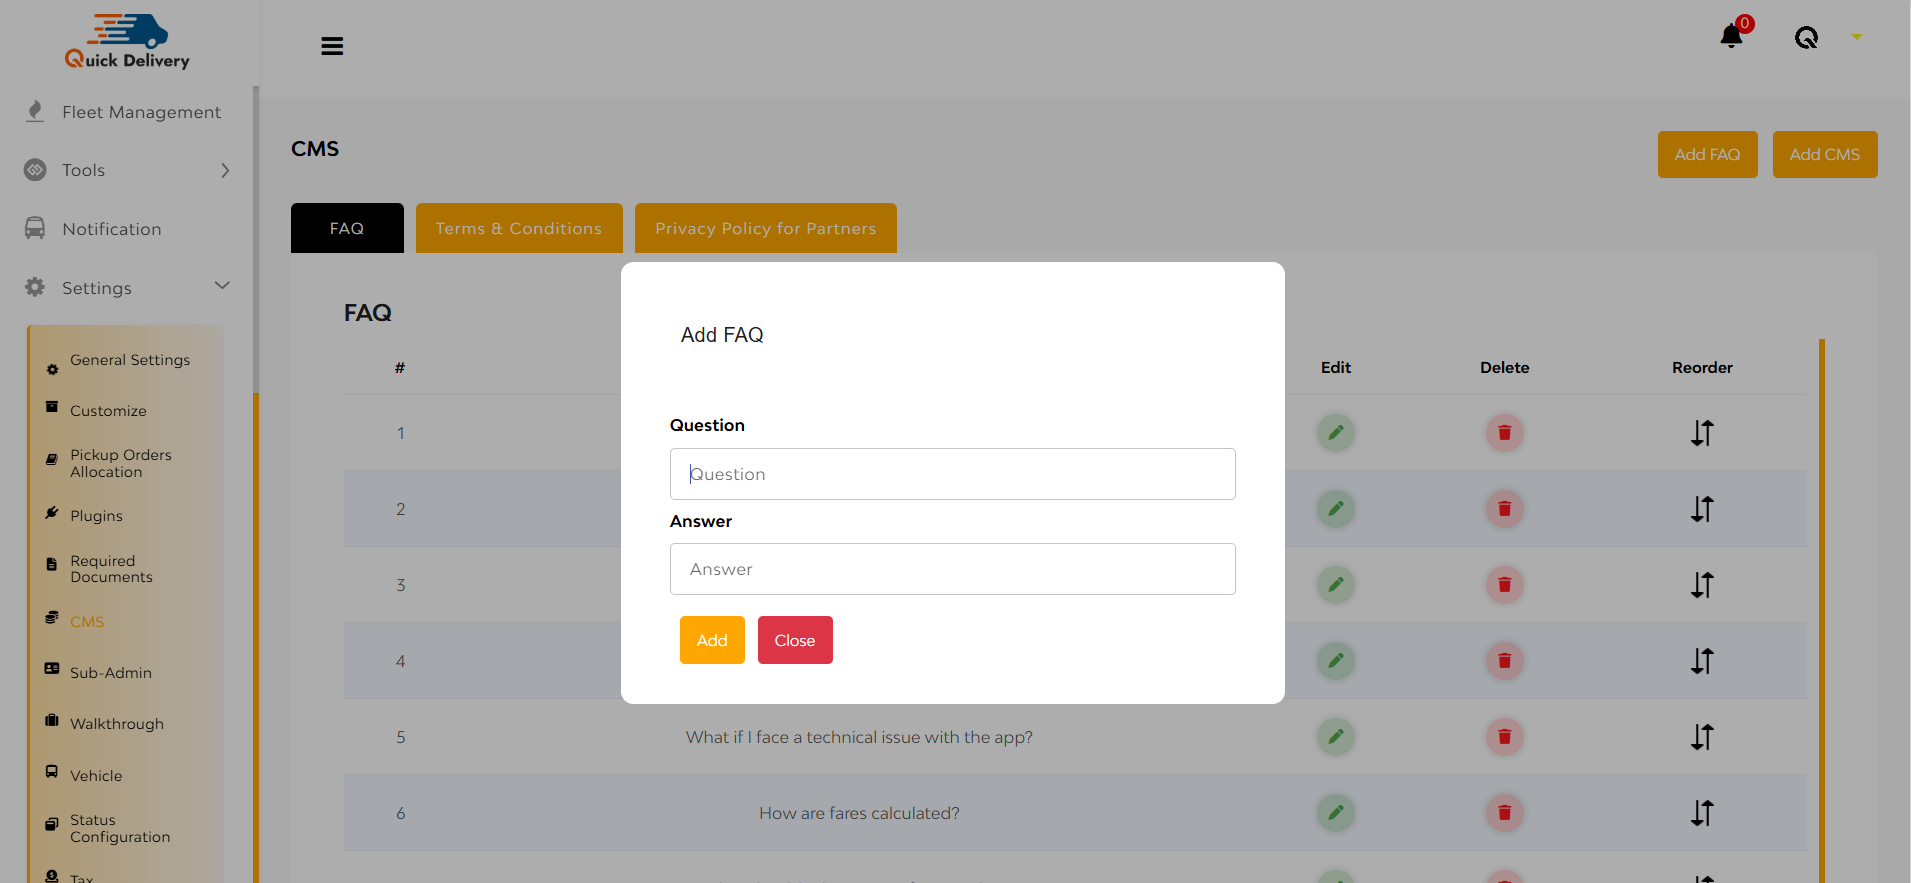
- Click Add FAQ
- Fill in:
- Question Title
- Answer Content
- Save to make it live for users under the FAQ tab
Add CMS

When editing or adding content:
- You specify the CMS Title (e.g., Terms & Conditions).
- Choose the Show Type (LOGIN, SIGNUP, SIDEBAR).
- Decide if a Checkbox is Required (common for agreements).
- Use the rich text CMS Content Editor to enter formatted content.
Terms & Conditions for Partners
Here, the admin can define the rules of engagement for partners. The section shown includes:
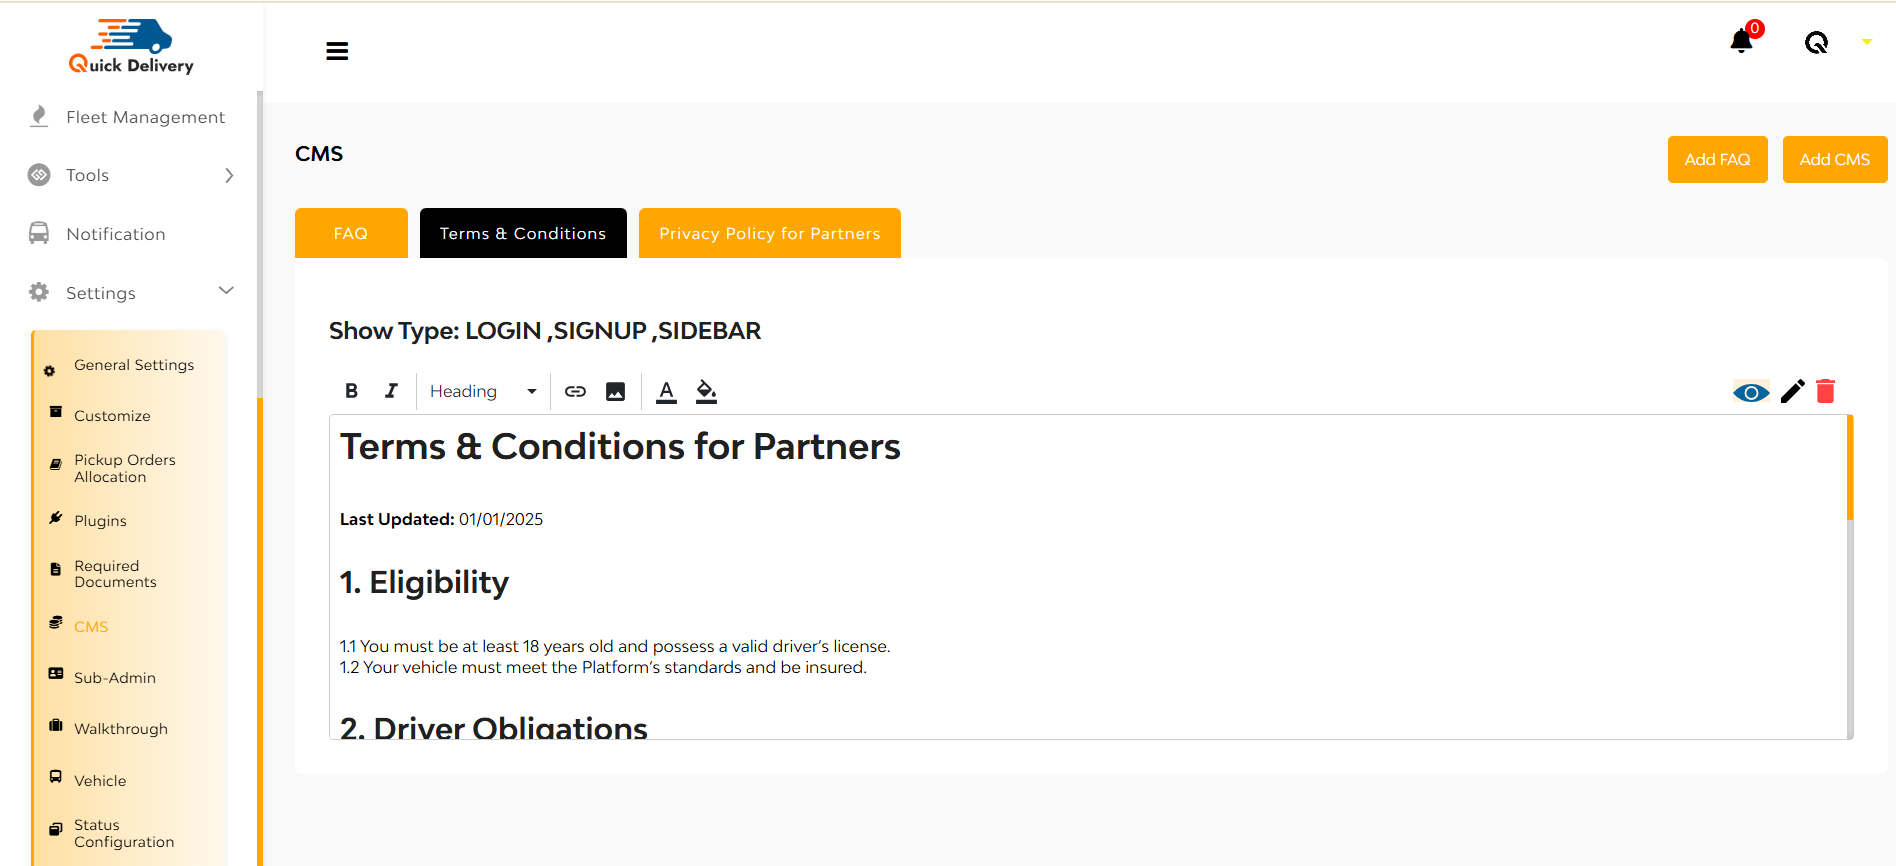
- Eligibility: Simple criteria such as being 18+ with a valid driver’s license.
- Vehicle Standards: Must meet platform criteria and be insured.
- Driver Obligations (visible upon scrolling): Details expectations and responsibilities of partners.
Edit/View/Delete icons are conveniently located at the top right for quick modifications.
Privacy Policy for Partners
This section transparently outlines what partner data is collected and how it’s used. It includes:

- Personal Info (name, email, phone, banking)
- Vehicle Info (plate number, insurance)
- Location Data (real-time GPS)
- Usage Data (ride logs, app activity)
Editable at any time via intuitive control icons.
Sub Admin
The Sub-Admin section is your command center for team access control—perfect for delegating responsibilities while keeping control centralized.
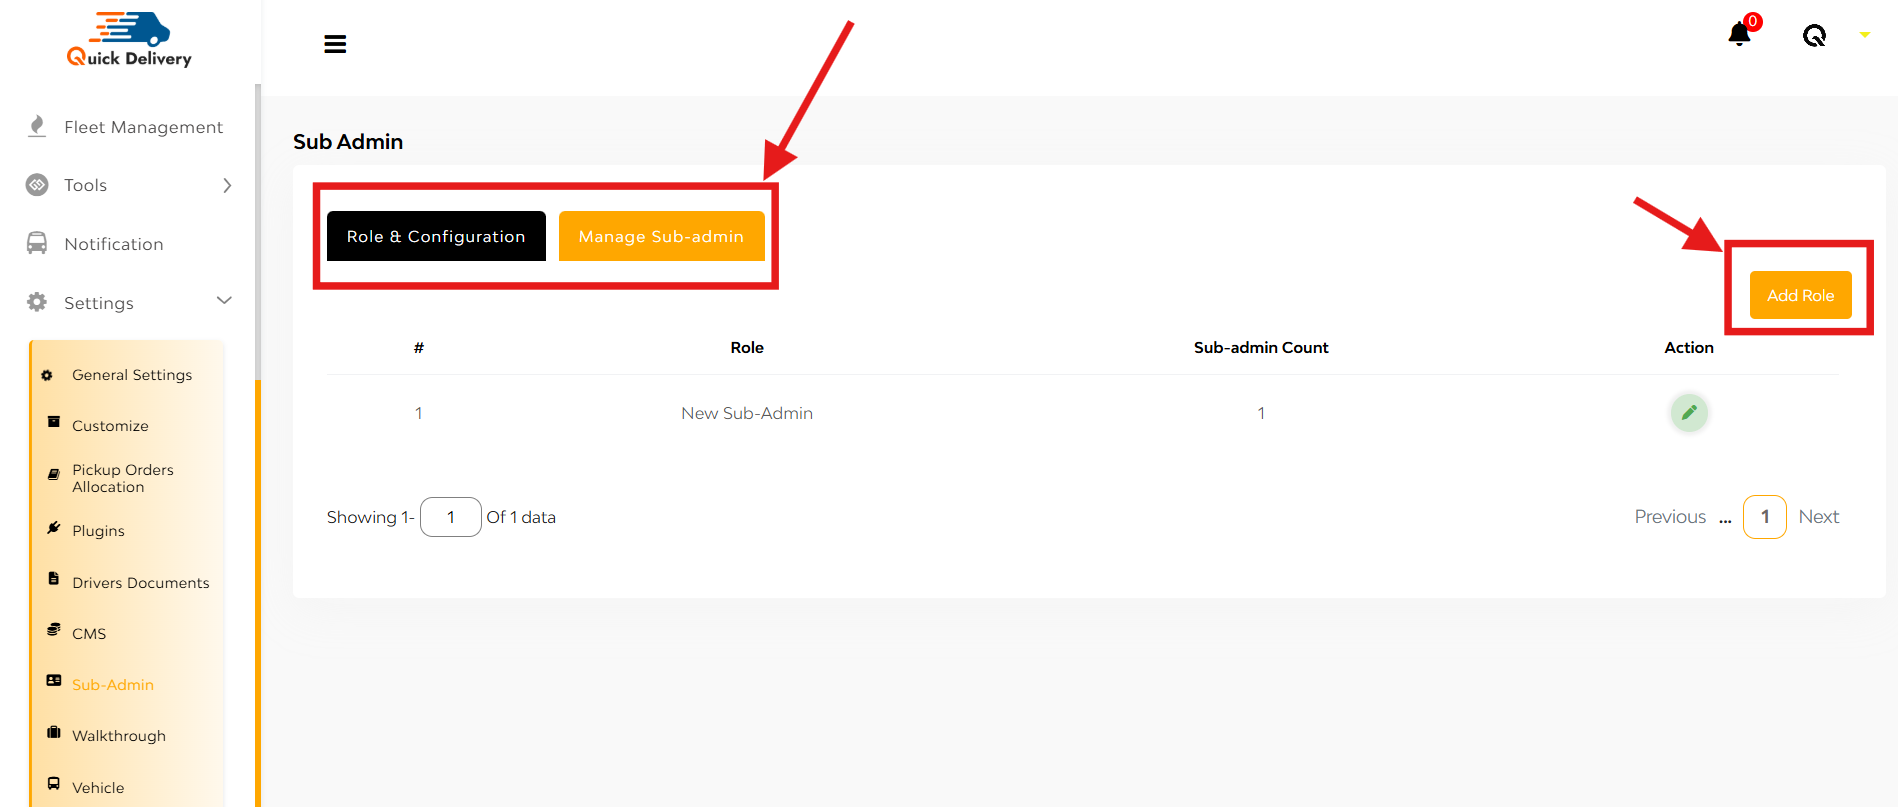
You’ll see two tabs:
- Role & Configuration
- Manage Sub-admin
Role & Configuration
Here you’ll see a list of roles along with:
- Role Name
- Sub-admin Count (how many users are assigned to the role)
- Action (edit/delete)
+ Add Role
Click the “Add Role” button at the top-right. You’ll be taken to a role-creation page.
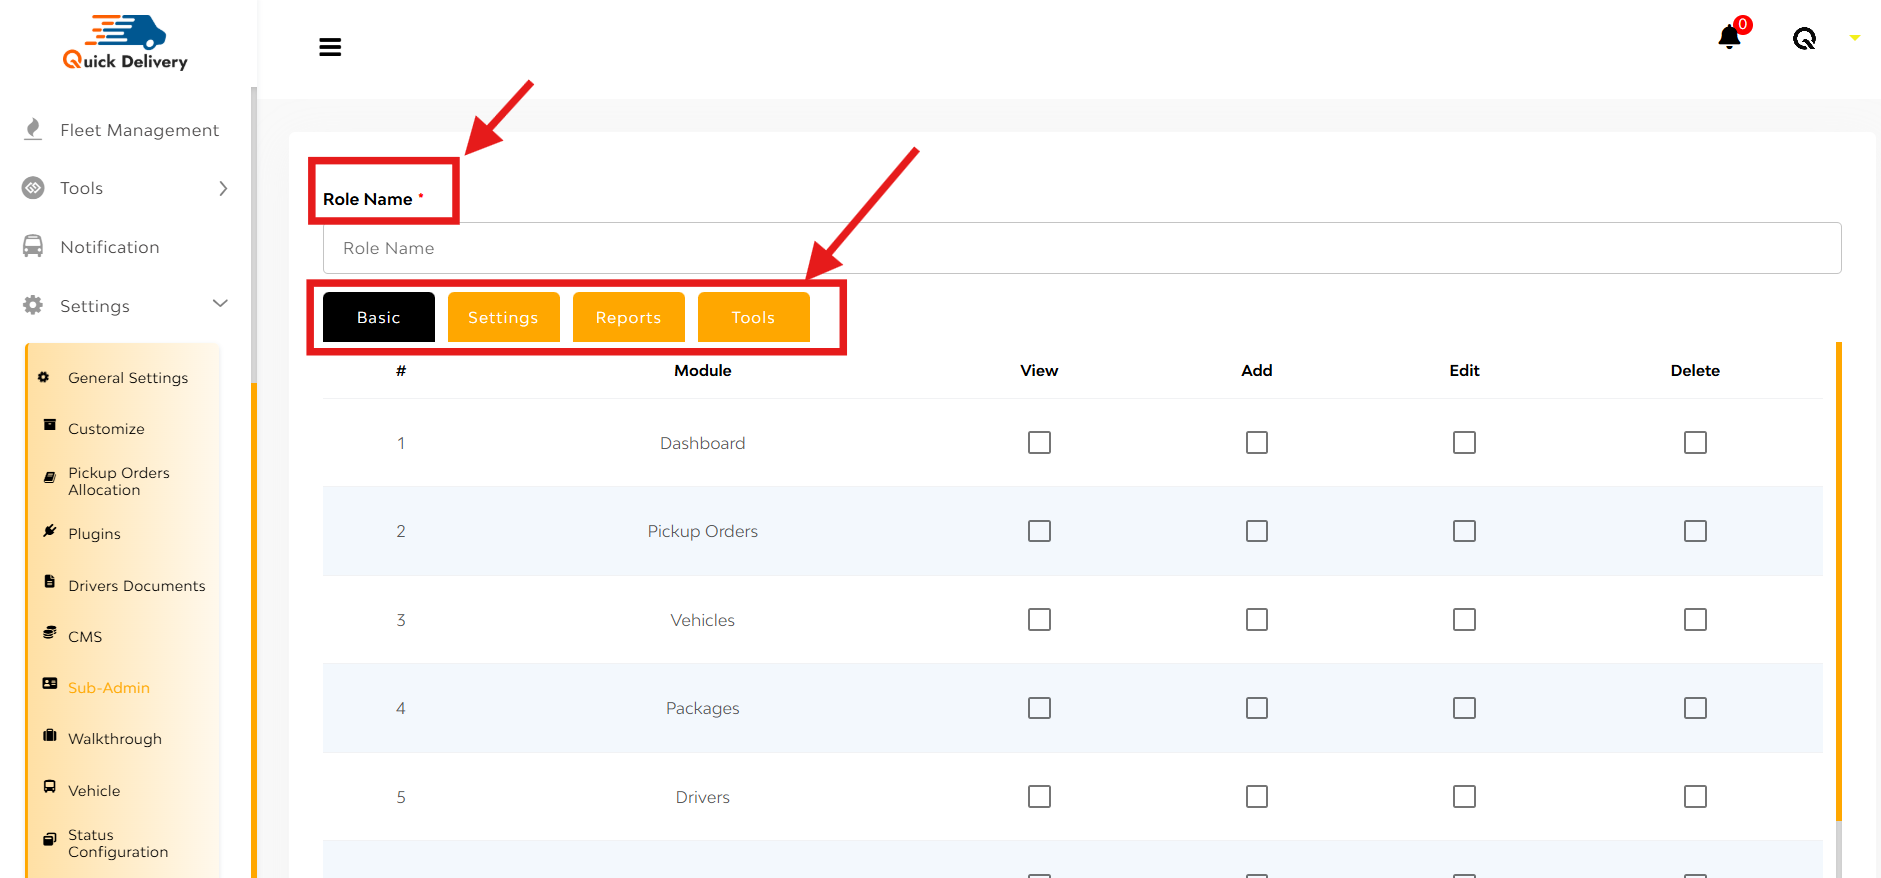
Here’s what you’ll set up:
Role Name: Define what this role is called (e.g., “Pickup Manager”).
Four Main Access Sections:
Each section includes access levels like View, Add, Edit, Delete for each module.
- Basic
Control core features like:
- Dashboard
- Pickup Orders
- Vehicles
- Packages
- Drivers
- Settings
Fine-tune system configuration access:
- General Settings
- Customize
- Pickup Order Allocation
- Plugins
- Driver Documents
- CMS
- Walkthrough
- Vehicle
- Status Configuration
- Tax
- Reports
Grant permission to view business metrics:
- Payouts
- Pending Payouts
- Active Areas
- Fleet Earning
- Precise Reports
- Tools
Provide access to business tools:
- Referral & Earn
- Surcharge
Save Button at the bottom ensures your settings are locked in
Walkthrough
The Walkthrough module is designed to onboard and guide new users with visual instructions.
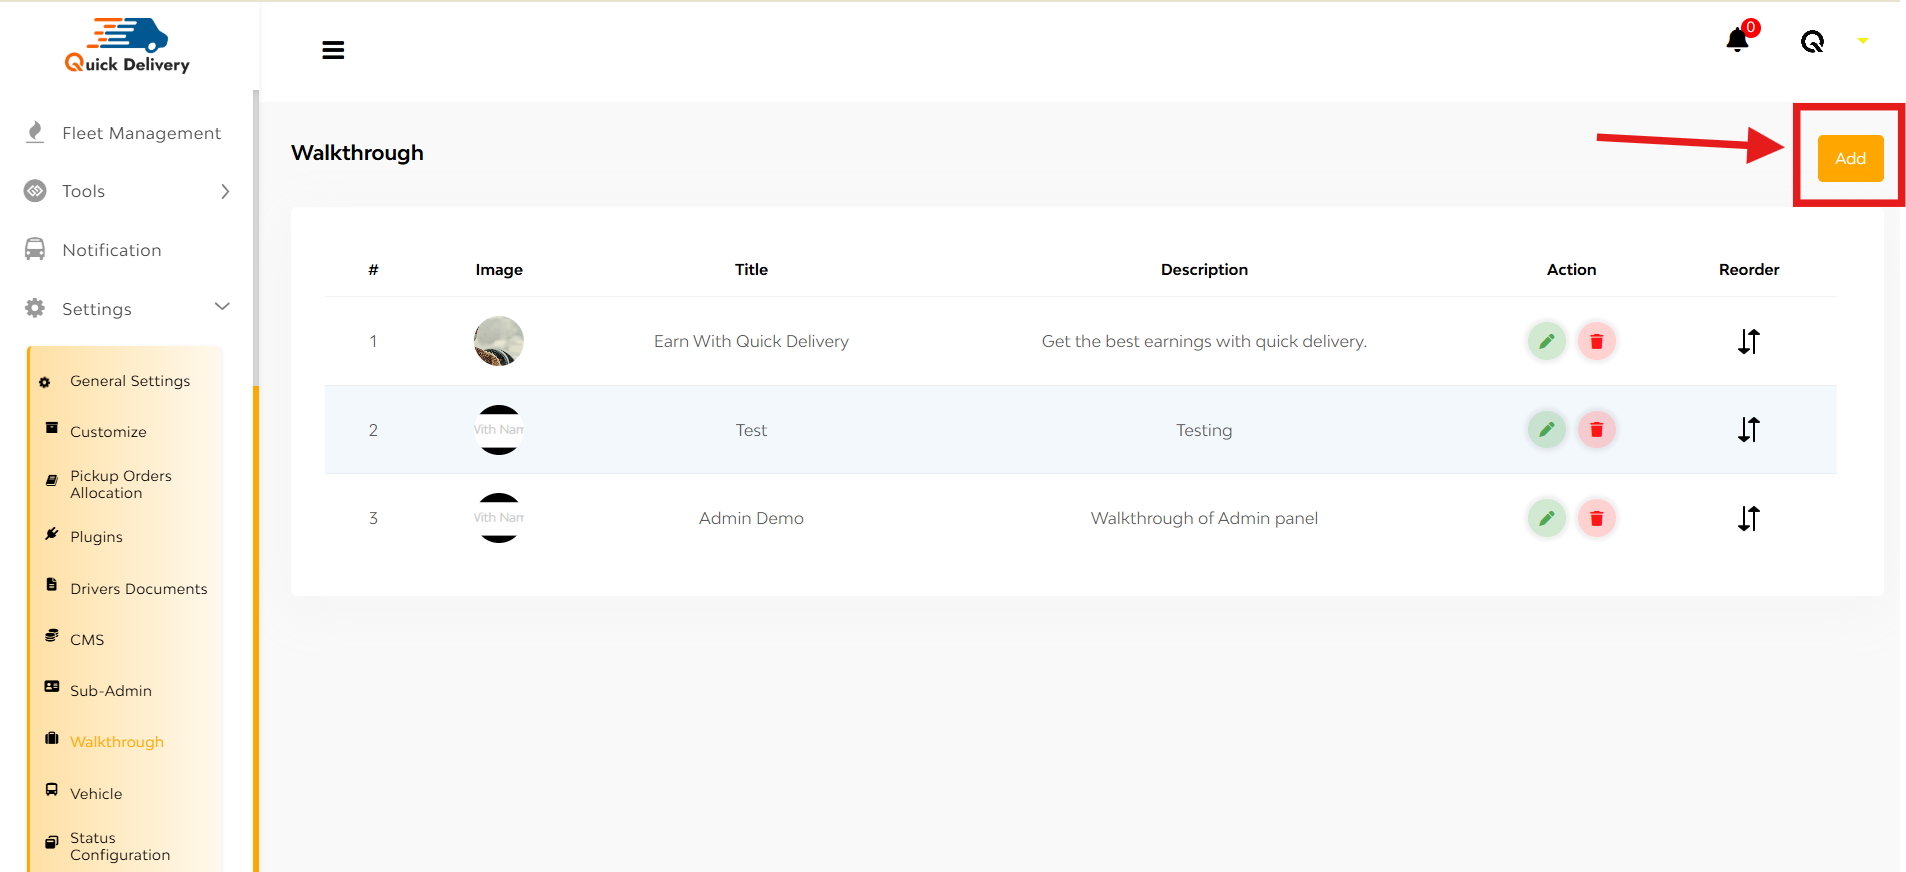
What You’ll See:
A table listing:
- Image – Visual step representation
- Title – Step heading or label
- Description – A short explanation
- Action – Edit or Delete the step
- Reorder – Drag and rearrange walkthrough sequence
+ Add
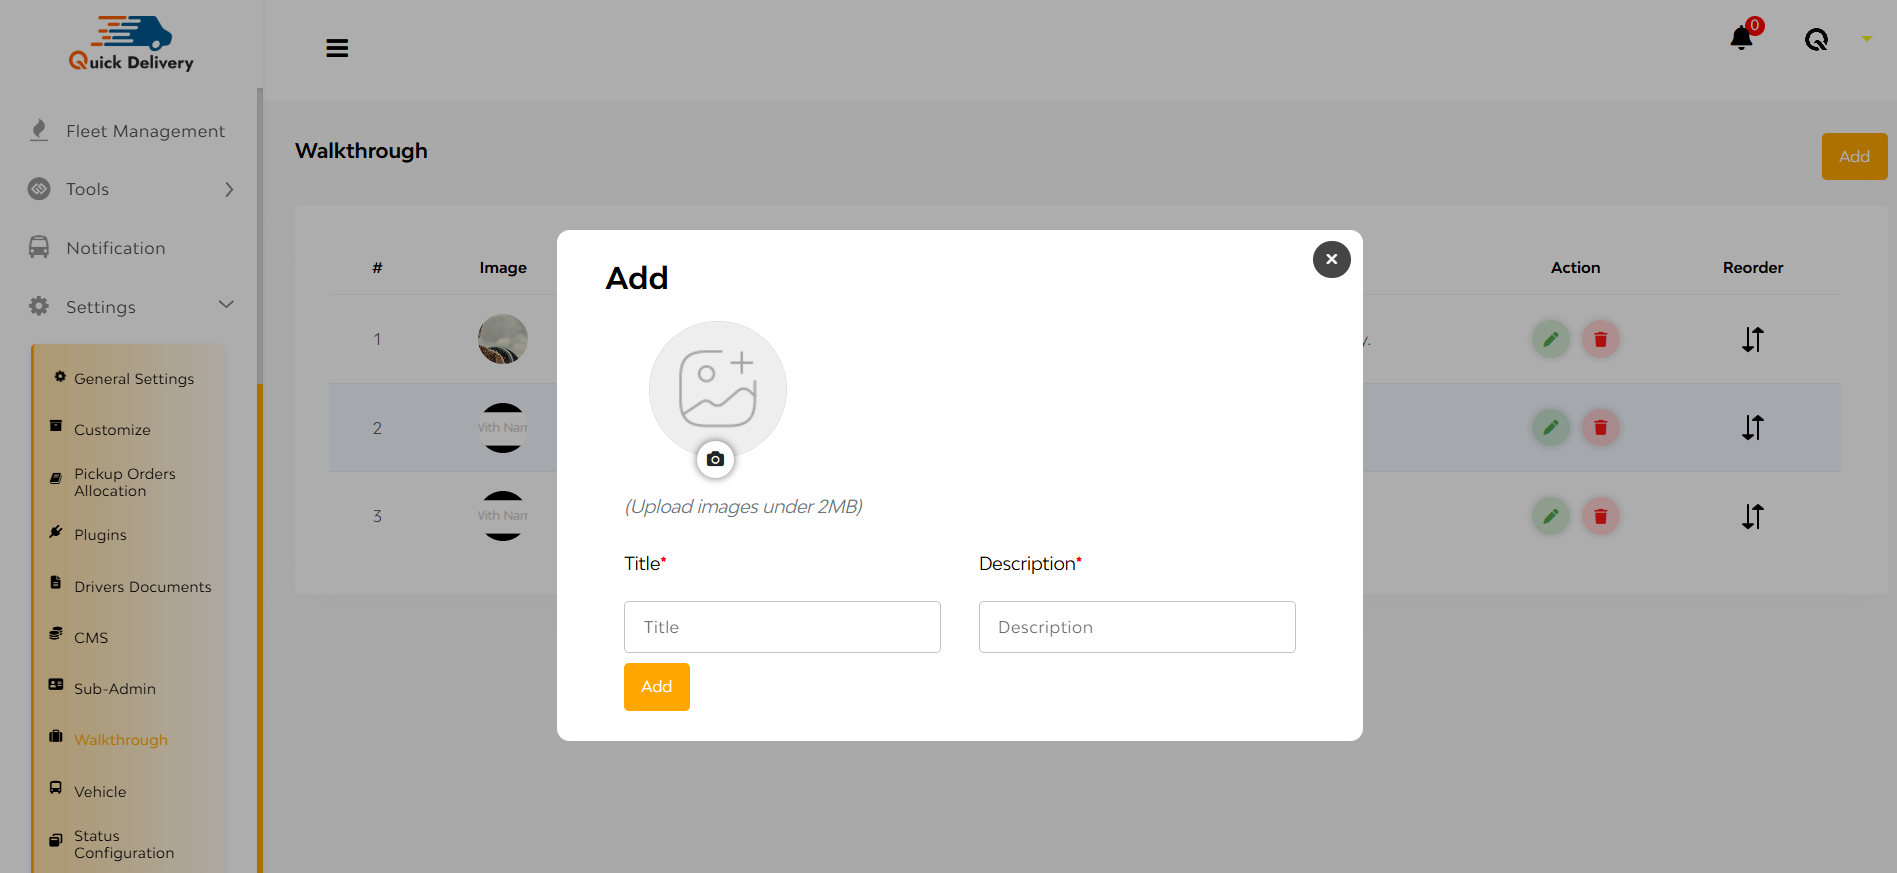
- Click the “Add” button on the top right.
- A popup opens where you:
- Upload an Image
- Enter a Title
- Write a Description
- Hit the Add button to save.
Vehicles
The Vehicles module helps you manage and customize the types of vehicles in your system—ensuring the dispatcher knows exactly what’s available.
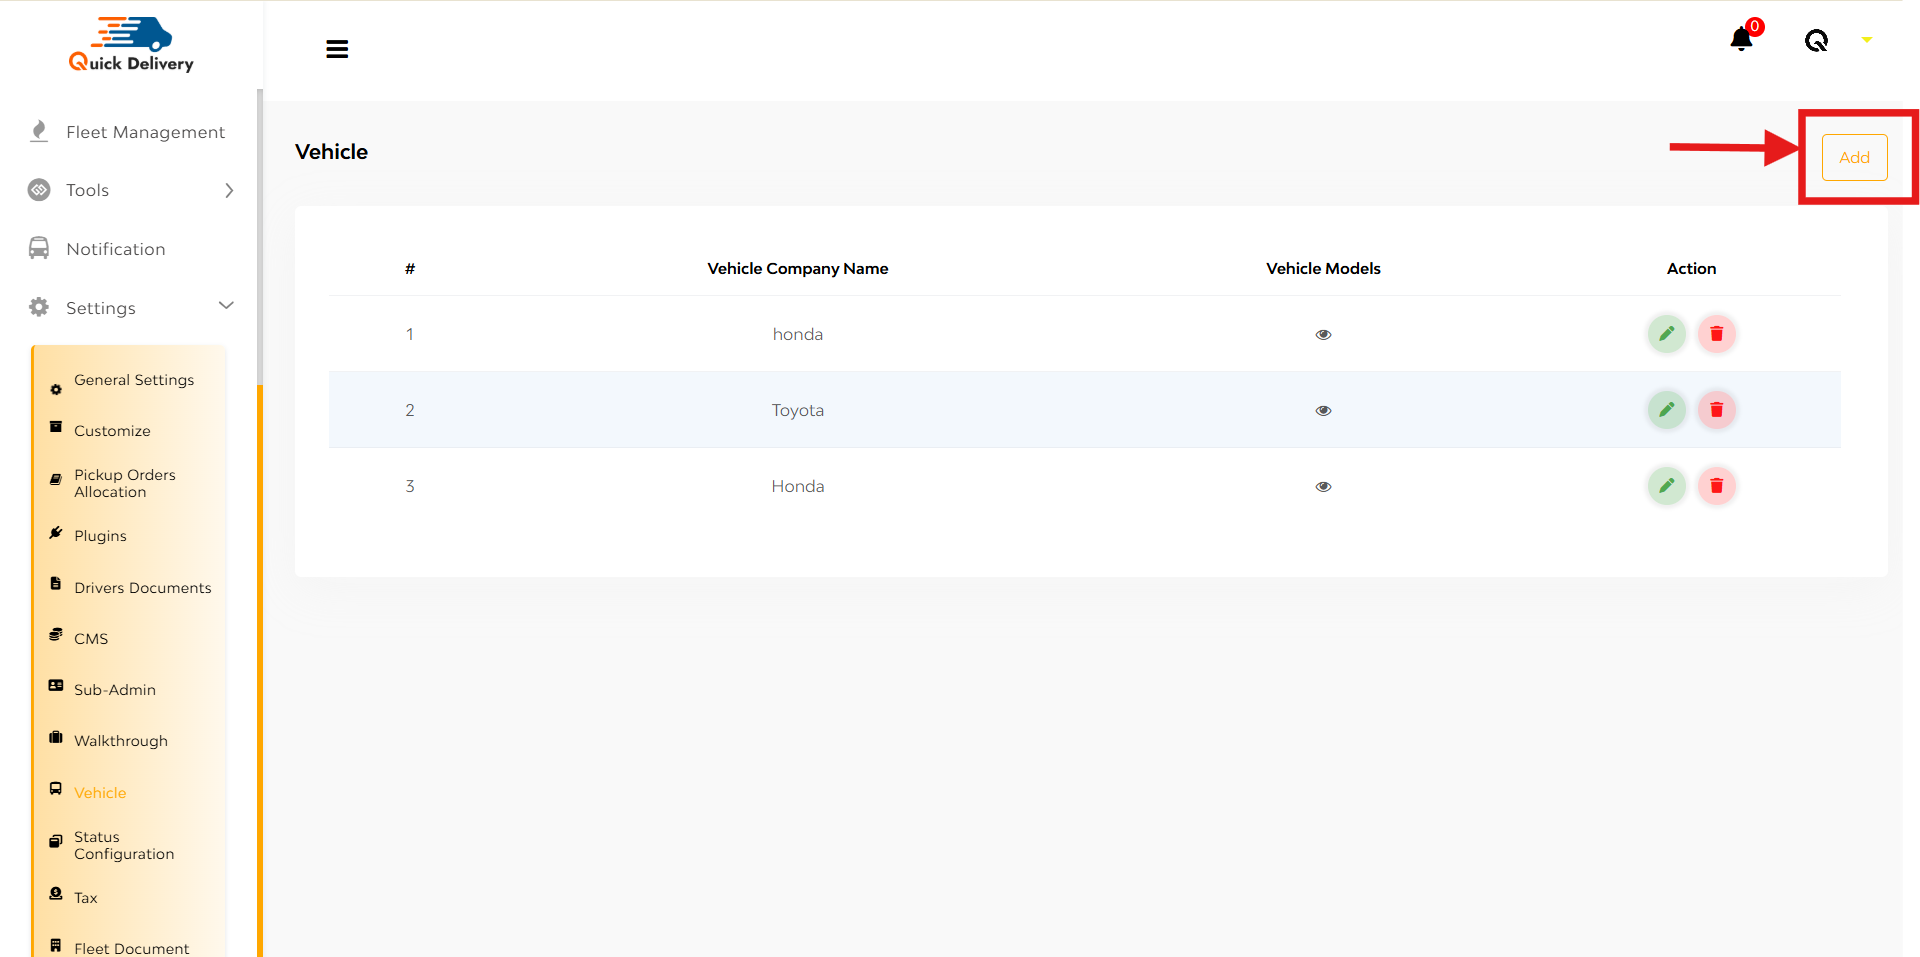
A list of all configured vehicles with:
- Company Name – Manufacturer or vehicle brand
- Vehicle Models – Associated model names under each company
- Actions – Edit or Delete options to manage entries
+Add

- Tap the “Add” button at the top right.
- A popup will appear:
- Enter the Company Name
- Enter the Model Name
- Click “Add Model” to include more if needed
- Hit the “Add” button to save everything.
Status Configuration
This panel lets you fine-tune the ride status steps for taxi bookings—giving you control over what stages appear and how they behave.
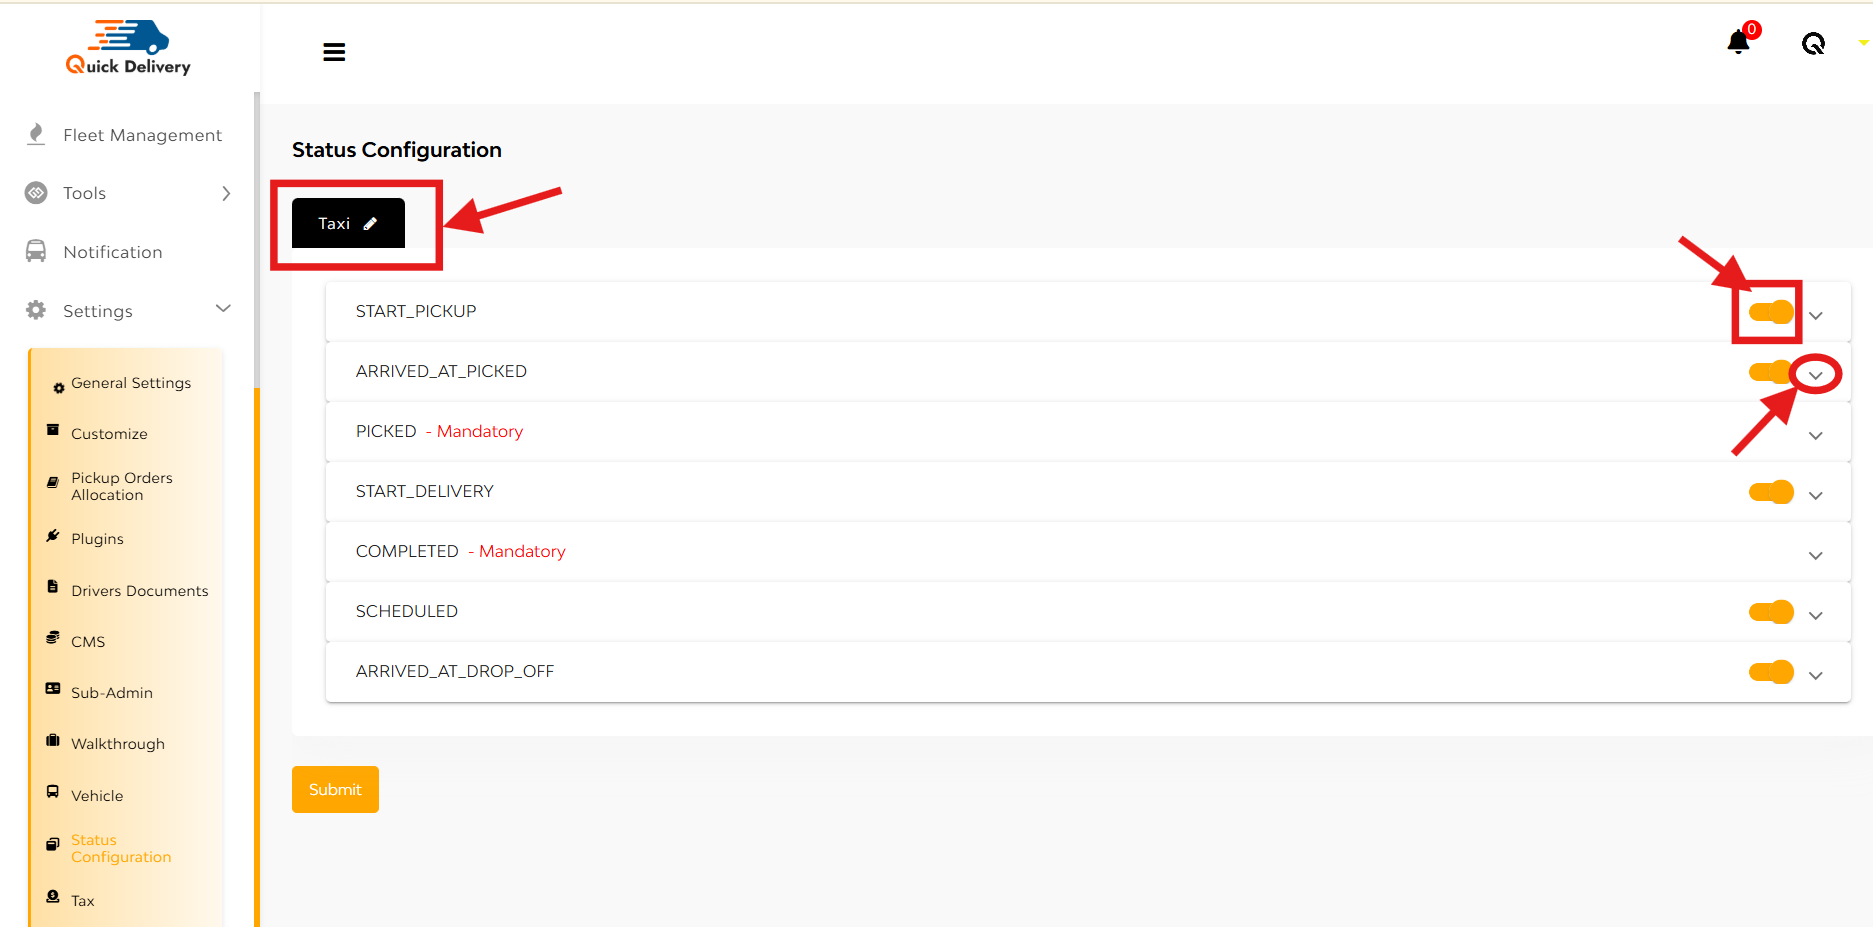
At the top-left, you’ll see a Taxi label with a pencil icon—tap to rename it if needed.
Status List You’ll See:
Each of the following statuses comes with:
- A toggle button to enable/disable
- An arrow (^) button to open detailed settings
Statuses include:
- Start-Pickup
- Arrived-at-Pickup
- Picked (mandatory)
- Start-Delivery
- Completed (mandatory)
- Scheduled
- Arrived-at-Drop-off
Tap the Arrow to Configure Details
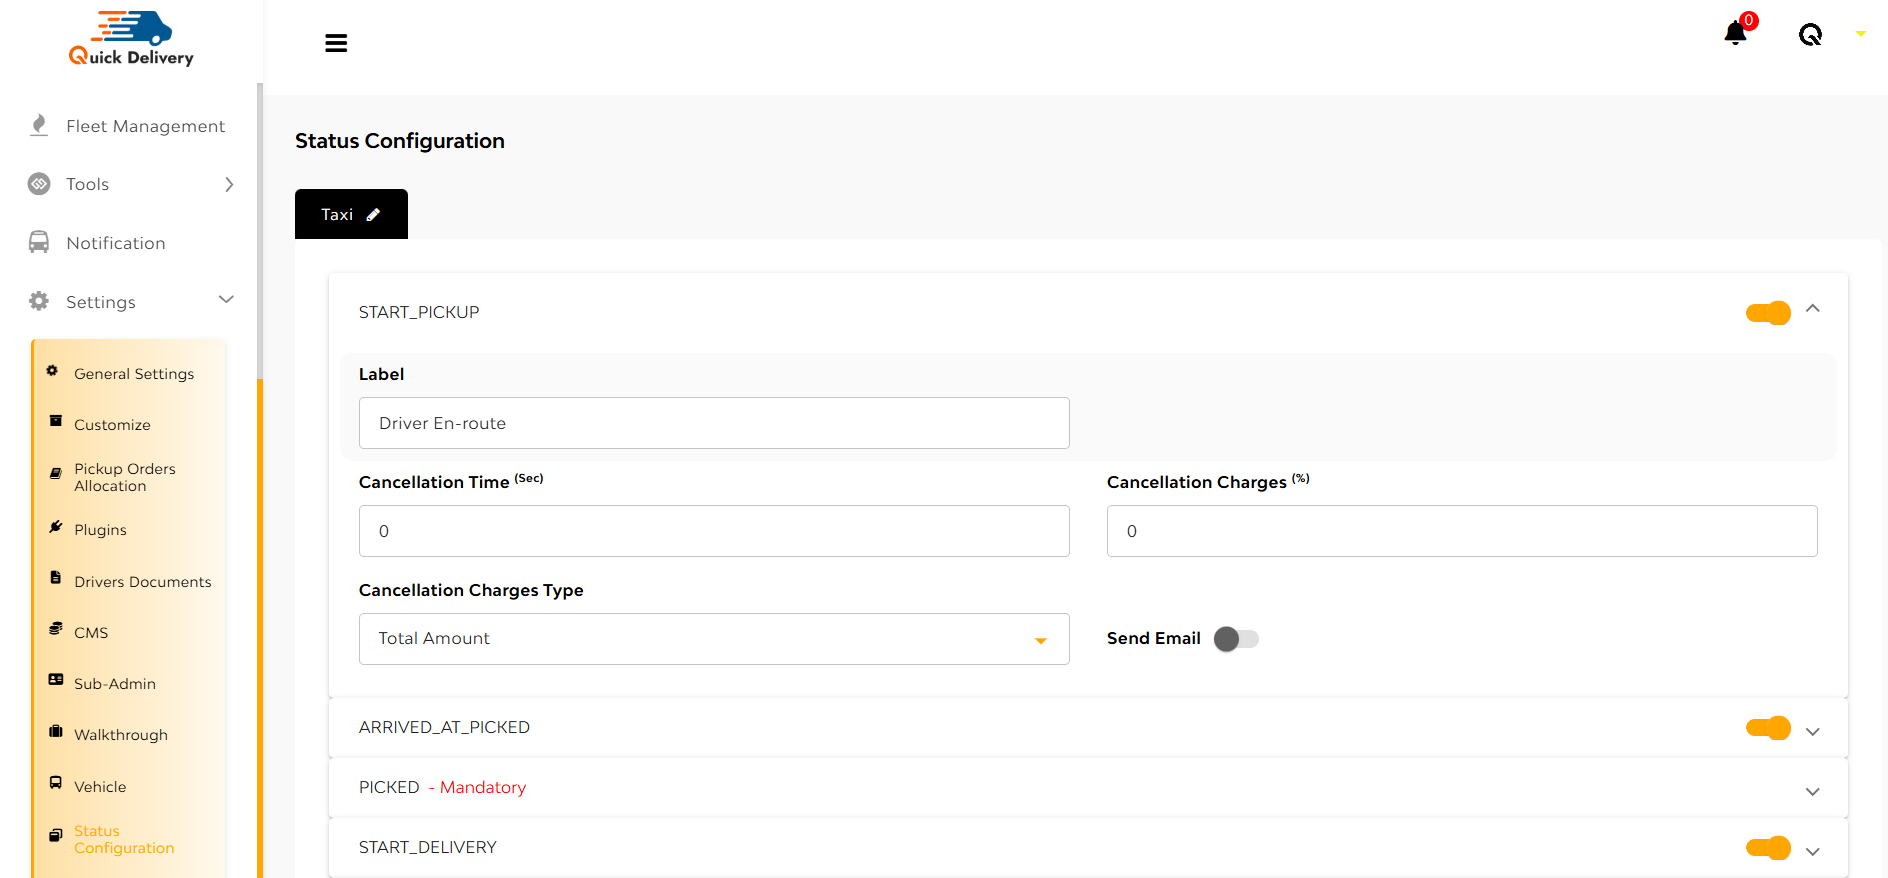
A form will open where you can set:
- Label (e.g. “Driver en route”)
- Cancellation Time (sec)
- Cancellation Charges (%)
- Charges Type (flat/percentage)
- Send Email (toggle on/off)
For Picked and Completed statuses, an additional field—Popup Label—appears to define what the driver sees on completion.
Hit Submit to save your changes.
Tax
The Tax section allows you to manage all the applicable service taxes—like VAT, GST, or Service Tax—that are added to user or partner transactions.
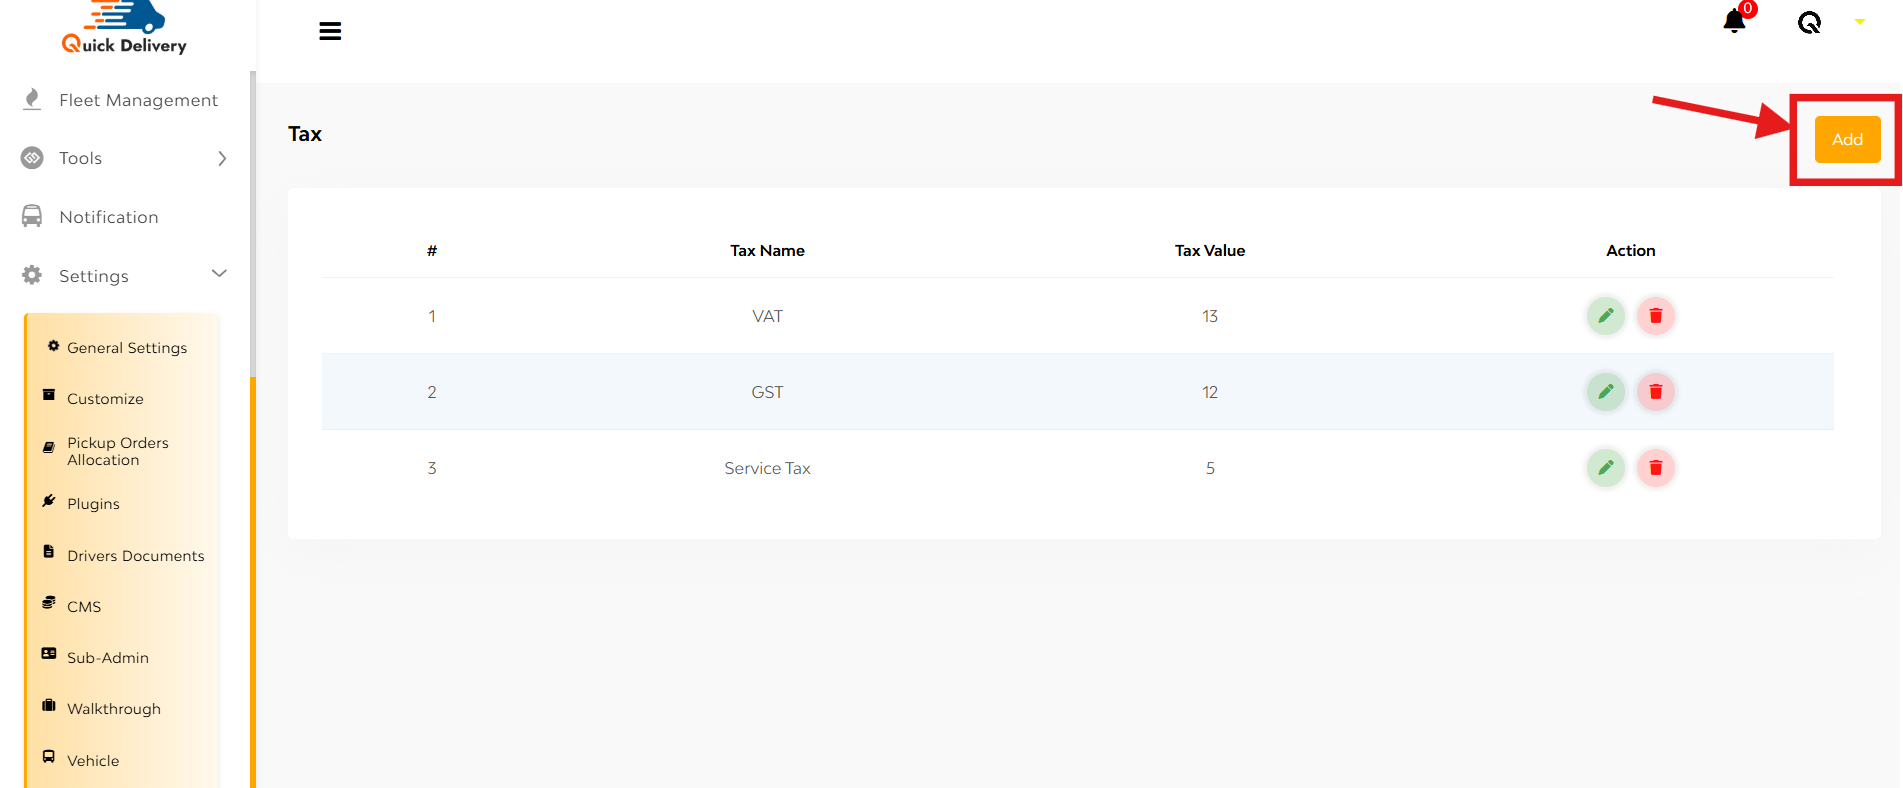
You’ll see a list displaying:
- Tax Name (e.g. VAT, GST)
- Tax Value (in numbers)
- Action: Options to Edit or Delete any existing tax entry
+Add
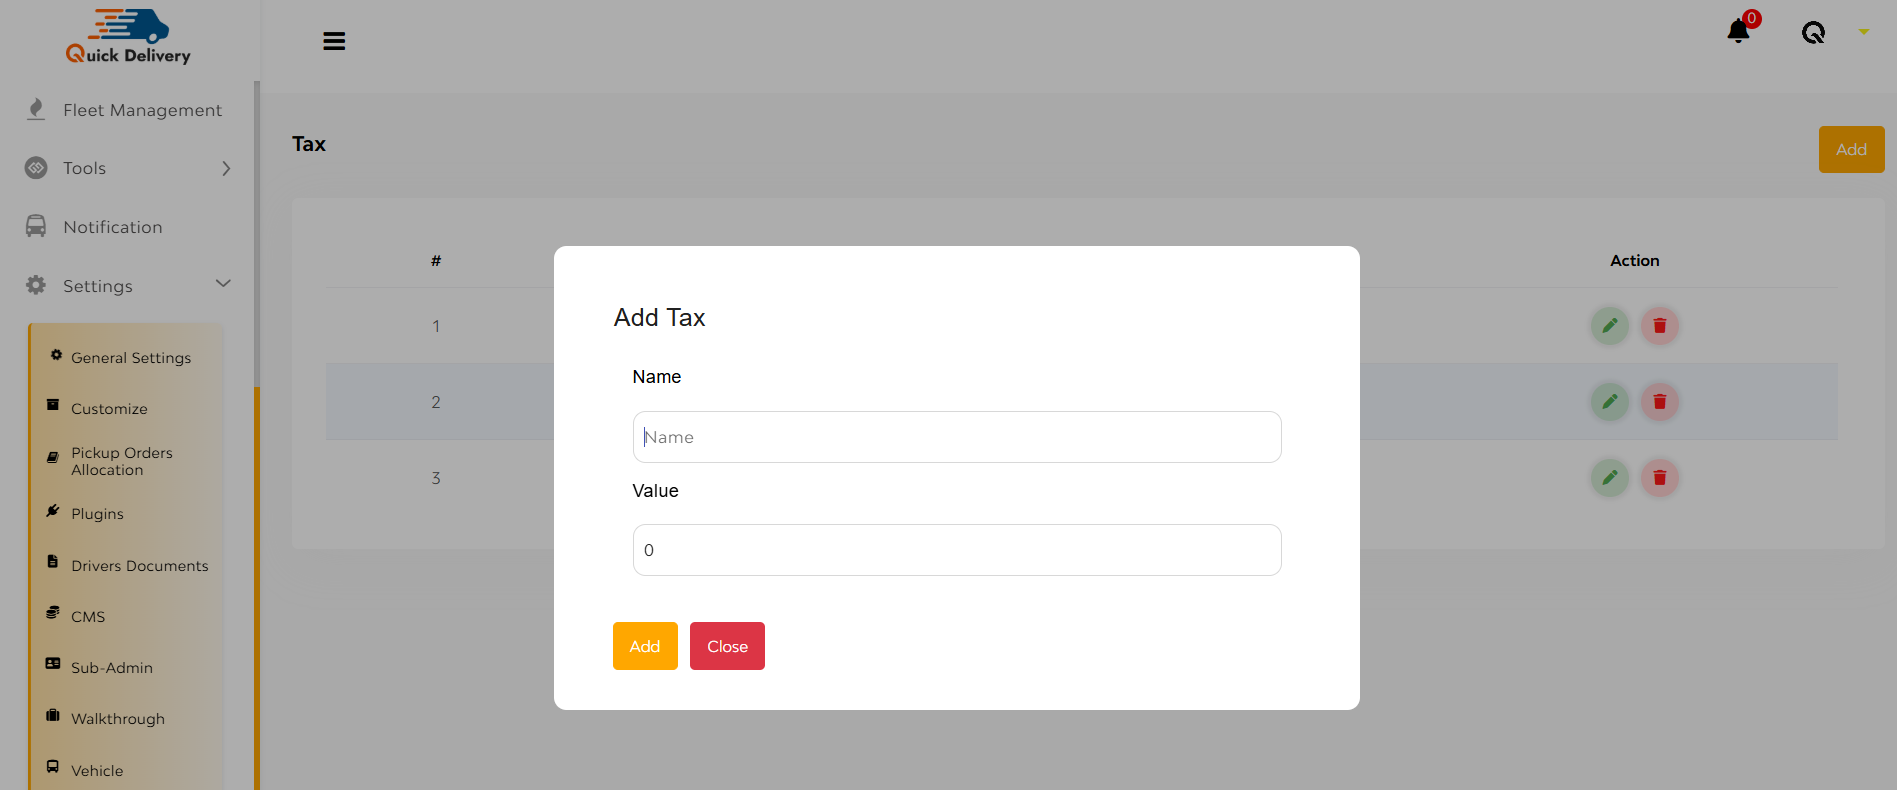
- Click the “Add” button at the top right.
- A popup will open—enter the Tax Name and Tax Value.
- Hit Add to save it.
Fleet Documents
Managing fleet compliance is effortless with this section. It allows you to define, track, and monitor essential documents related to your fleets, ensuring everything is always up to date.

You’ll see a table listing:
- Document Name
- Document Type (e.g. image front/back/both)
- Mandatory (Yes/No)
- Document Number Required
- Issue Date Required
- Expiry Date Required
+Add
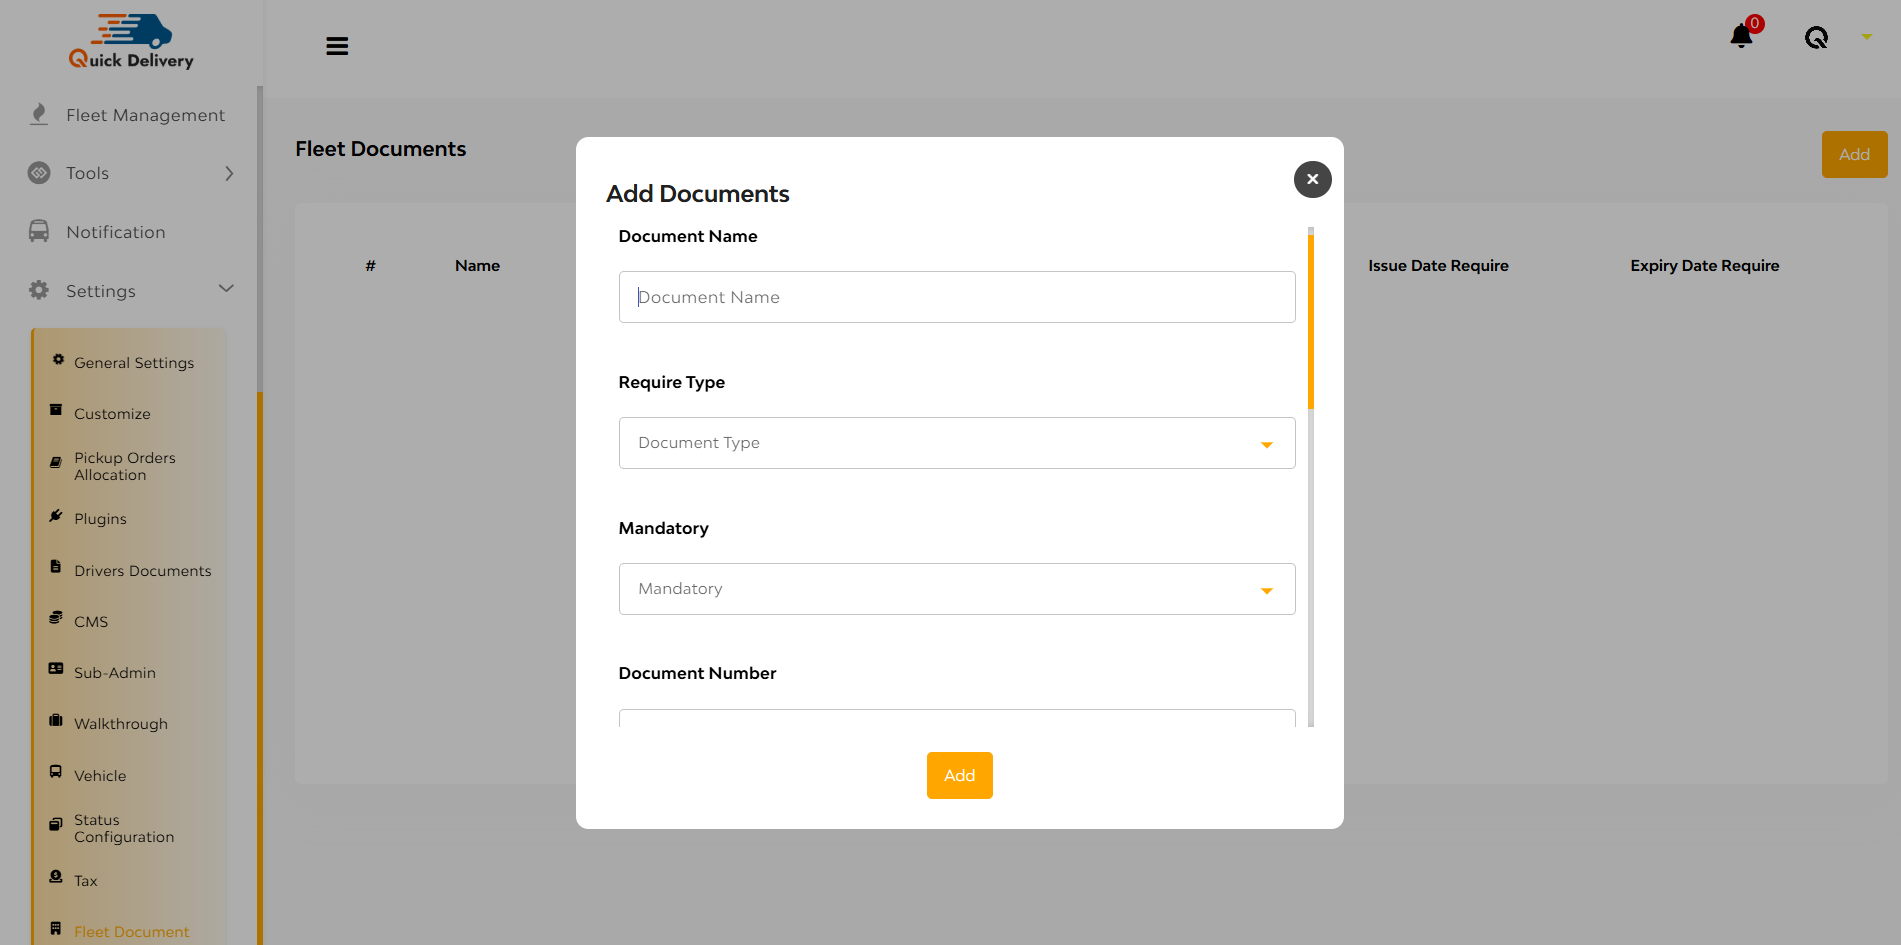
- Click the “Add” button at the top right.
- A popup will appear where you can:
- Enter Document Name
- Choose Type (Front, Back, or Both)
- Set Mandatory field (Yes/No)
- Enable fields for Document Number, Issue Date, Expiry Date
- Tap + Notification option to:
- Define Reminder Days
- Choose Type (Front, Back, or Both)
- Choose to Send Notification (Yes/No)
- Add Notification Title and Message
- Click Add to finalize.